Picking the correct subnet from Aviatrix created VPC

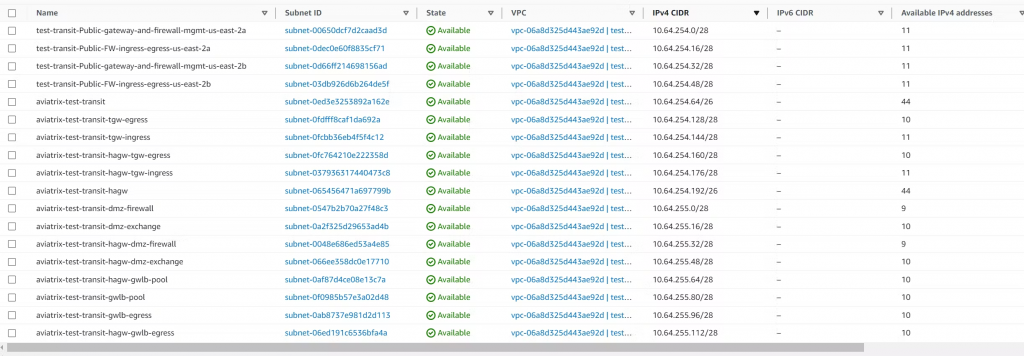
Resource aviatrix_vpc creates a VPC/vNet/VCN in various cloud types. For Aviatrix Transit VPC, there would be various different subnets created for the purpose of integrating with SDWan appliances, insertion of Firewalls, integration with AWS TGW (Aviatrix Orchestrated), or utilizing AWS Gateway Load Balancer etc.

An example of subnets created in AWS for Aviatrix Transit VPC with High-Performance Encryption, TGW-O integration, and Firewall integration with GWLB.

Continue reading

Aviatrix Edge 2.0 features

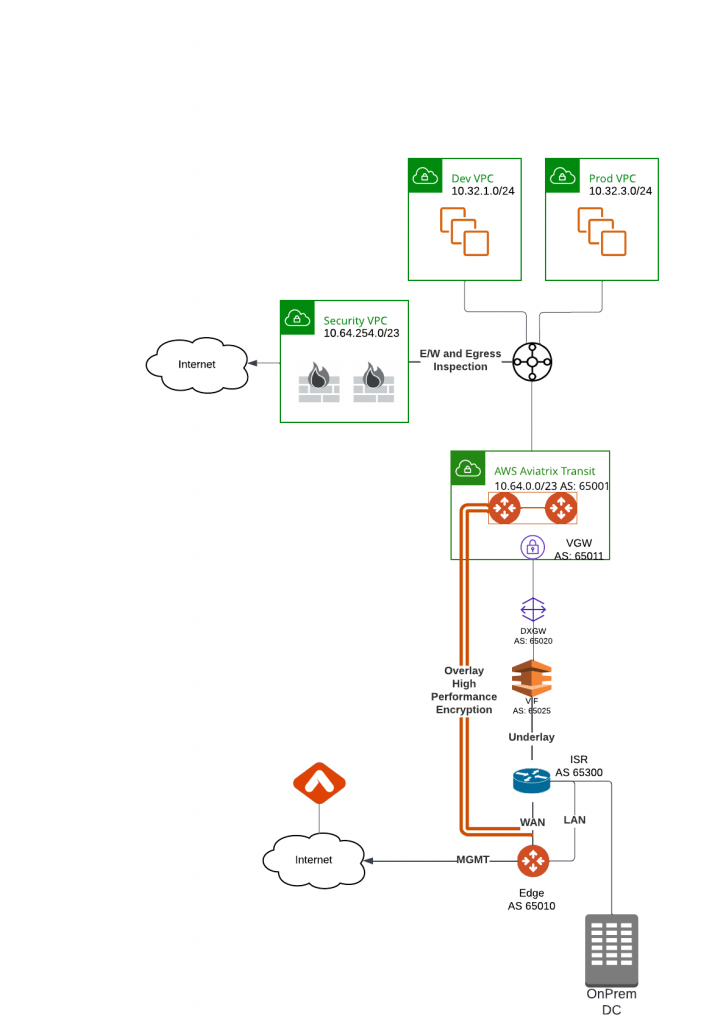
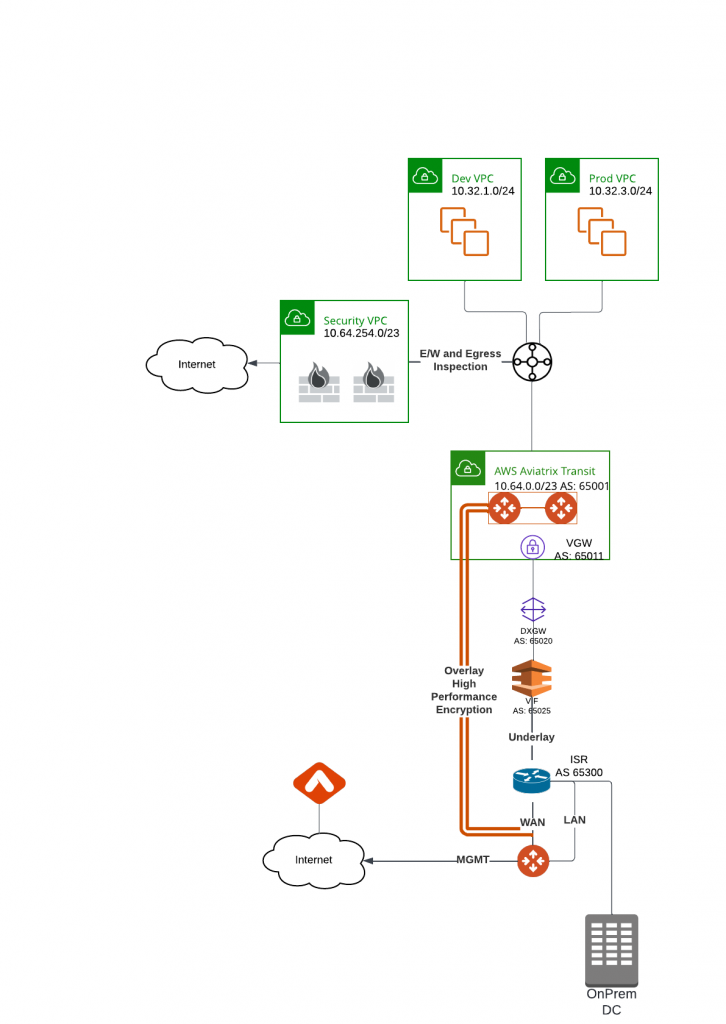
In our last blog, “AWS Hybrid Architecture and Edge 2.0,” we covered the workflow of registering an Edge 2.0 gateway, attaching it to Aviatrix Transit, and forming a BGP peering with on-premise devices. Now, let’s take a closer look at the features of the Edge 2.0 gateway. By leveraging Edge 2.0, enterprises gain high throughput and intelligent packet processing capabilities at the edge of their network. Edge 2.0 provides a robust set of features, including intelligent packet routing to streamline network traffic and advanced security features, such as network segmentation, to provide an added layer of protection to your network.

Continue reading

AWS Hybrid architecture and Edge 2.0

One of our customers approached Aviatrix in search of a high-performance encryption solution for their on-premise data centers and AWS. They were impressed with Aviatrix’s features, including visibility, a dedicated data plane, high-throughput encryption, and Terraform capability. However, they also had sister business entities still using AWS TGW, and didn’t want to spend too much time trying to convince them to switch to Aviatrix. That’s when they turned to us for a hybrid architecture solution.

Continue reading

Using AWS TGW Connect with Aviatrix Transit to build GRE tunnels

When customers are migrating to Aviatrix Transit from AWS TGW, we would build BGP connectivity between AWS TGW with Aviatrix Transit. In the past, we have to use IPSec, which would be limited to 1.25G per tunnel connection speed, for customer’s that doesn’t require end to end encryption during the migration, with AWS TGW Connect, now we can build GRE tunnels between AWS TGW and Aviatrix Transit.

Continue reading

Publish module to Terraform Registry

Why?

git repository is distributed in nature, also there are tons of repositories not using terraform. You have just created a killer terraform solution and cannot wait to share with world, instead of trying to send people the git repo link, how about publish it to terraform registry, and now everyone can search and simply use it as a module? After all, let’s keep it DRY (Don’t repeat yourself) as much as possible.

Continue reading

Terraform AWS Cross-Account access

Pre-requisite

  • Two AWS accounts: AccountA and AccountB
  • IAM programmatic access user already setup and working for Terraform in AccountA, let’s call this user Terraform-User, and it already have role assigned in AccountA
  • Now that we are going to use the same Terraform-User access key and secret to work on resources in AccountB

Create a new role in AccountB

  • Trusted entity -> AWS account -> since AccountB need to trust AccountA, enter AccountA’s account ID
  • Assign required permission polices to this role, eg: AdministratorAccess
  • Assign a role name, eg: CrossAccountSignin
  • Example of the role JSON created
{
    "Version": "2012-10-17",
    "Statement": [
        {
            "Effect": "Allow",
            "Principal": {
                "AWS": "arn:aws:iam::AccountA_Account_ID:root"
            },
            "Action": "sts:AssumeRole",
            "Condition": {}
        }
    ]
}
  • Note down the ARN of this role, eg:
    arn:aws:iam::AccountB_Account_ID:role/CrossAccountSignin

Create and assign policy in AccountA

  • Use following JSON definition
  • “Resource” point to the ARN of the CrossAccountSignin role created in AccountB
{
    "Version": "2012-10-17",
    "Statement": [
        {
            "Effect": "Allow",
            "Action": [
                "sts:AssumeRole"
            ],
            "Resource": "arn:aws:iam::AccountB_Account_ID:role/CrossAccountSignin"
        }
    ]
}
  • Assign this policy to AccountA IAM user: Terraform-User

Assume role in Terraform

  • providers.tf
    Notice an alias gets created for account_b
provider "aws" {
  region = "us-east-1"
}

provider "aws" {
  region = "us-east-1"
  alias  = "account_b"
  assume_role {
    role_arn = "arn:aws:iam::AccountB_Account_ID:role/CrossAccountSignin"
  }
}
  • main.tf
resource "aws_vpc" "account_a_vpc" {
  cidr_block = "10.0.1.0/24"
  tags = {
    "Name" = "account_a_vpc"
  }
}


resource "aws_vpc" "account_b_vpc" {
  provider   = aws.account_b
  cidr_block = "10.0.2.0/24"
  tags = {
    "Name" = "account_b_vpc"
  }
}
  • resource.aws_vpc.account_a_vpc will create VPC in AccountA implicitly
  • resource.aws_vpc.account_b_vpc will create VPC in AccountB by explicitly specifying provider = aws.account_b

Cross account access to data

Similarly to resource block, you can perform the same for data block, example:

  • Same providers.tf
provider "aws" {
  region = "us-east-1"
}

provider "aws" {
  region = "us-east-1"
  alias  = "account_b"
  assume_role {
    role_arn = "arn:aws:iam::AccountB_Account_ID:role/CrossAccountSignin"
  }
}
  • data.tf
data "aws_availability_zones" "az_zones" {
}

data "aws_availability_zones" "app_az_zones" {
  provider = aws.account_b
}
  • data.aws_availability_zones.az_zones will retrieve availability zones as Terraform-User from AccountA
  • data.aws_availability_zones.app_az_zones” will retrieve availability zones assume role in AccountB

Cross account for module

Assume we have following folder structure:

|_ main.tf
|  providers.tf
|_ modules
    |_ app
         |_ main.tf
         |_ providers.tf

Root /providers.tf have following statement as before:

provider "aws" {
  region = "us-east-1"
}

provider "aws" {
  region = "us-east-1"
  alias  = "account_b"
  assume_role {
    role_arn = "arn:aws:iam::AccountB_Account_ID:role/CrossAccountSignin"
  }
}

Root /main.tf have following statement

module "app1" {
  source   = "./modules/app"

   .
   .
   .
}

If you run it, you may find resources gets created in the default account : AccountA, where Terraform-User is resided. How do we make the resource create in AccountB instead?

Think of module a mini block of terraform code that also require it’s own provider block. If you don’t specify anything in /modules/app/providers.tf, it will implicitly have this block, basically it’s looking for a provider called aws

provider "aws" {
}

So we will modify /main.tf like this:

module "app1" {
  source   = "./modules/app"
   providers = {
    aws = aws.account_b
  }
   .
   .
   .
}

This is telling within the module, provider.aws is equal to root provider.aws.account_b.

If you rerun terraform apply. you will notice:

  • Resources created in AccountA remains
  • New resources get created in AccountB now
  • Warning message:
Warning: Provider aws is undefined
│
│   on main.tf line 8, in module "app1":
│    8:     aws = aws.account_b
│
│ Module module.app1 does not declare a provider named aws.
│ If you wish to specify a provider configuration for the module, add an entry for aws in the required_providers block within the module.

To make Terraform happy, add following lines in /modules/app/providers.tf

terraform {
  required_providers {

    aws = {
      source = "hashicorp/aws"
    }
  }
}

Add permanent environment variables

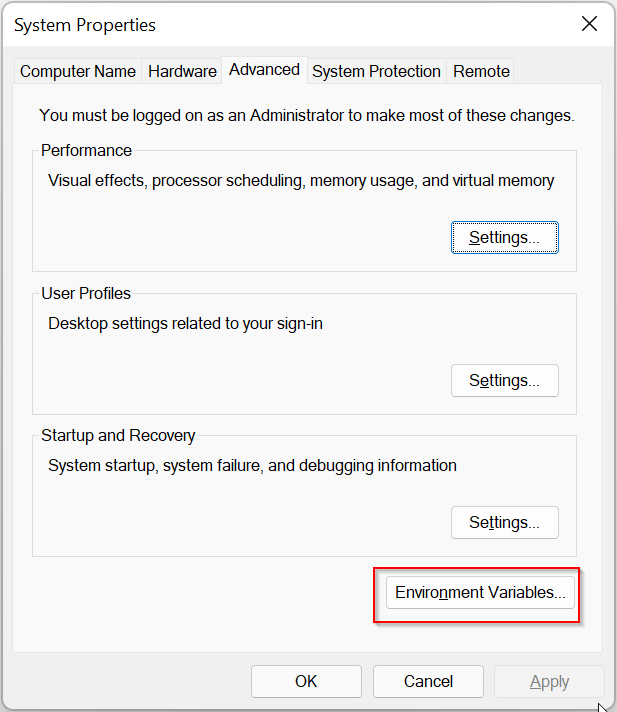
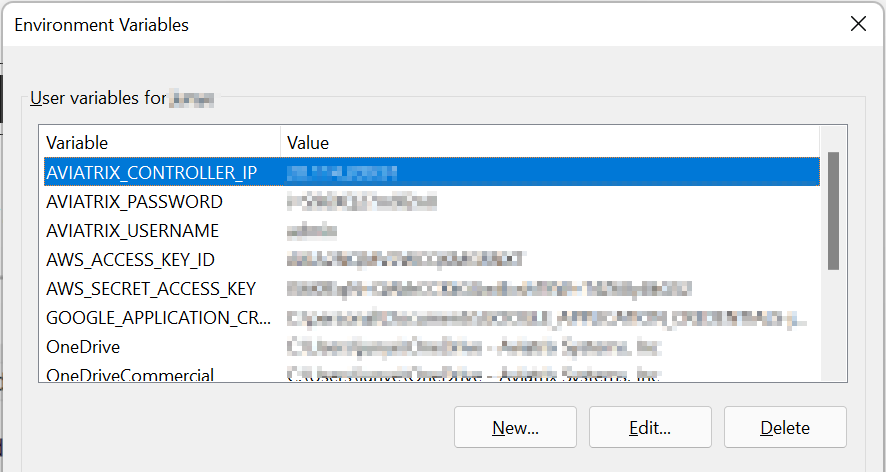
When you are using terraform or some other tools requiring environment variables, you may find the environment variables doesn’t stay between sessions.

Here’s how I took care of it:

Windows

This is rather easy, just go to System Properties by running sysdm.cpl in command line, then click on Environment Variables

Add or edit existing environment variables, such as AWS_ACCESS_KEY_ID or AWS_SECRET_ACCESS_KEY, the settings will take effect next time when you launch your command prompt or PowerShell session

Linux / Mac

First you have to find out what shell you are using:

$ echo $SHELL
  • If it returns: /bin/bash, then you are using bash, and need to edit ~/.bashrc
  • If it returns: /bin/zsh, then you are using zsh, and need to edit ~/.zshrc

Example of ~/.bashrc file. Make sure to place export in front of each line, and there should be no whitespace around equal sign =

$ cat ~/.bashrc

# environment variables
export AVIATRIX_CONTROLLER_IP='****'
export AVIATRIX_PASSWORD='****'
export AVIATRIX_USERNAME='****'
export AWS_ACCESS_KEY_ID='****'
export AWS_SECRET_ACCESS_KEY='****'
export GOOGLE_APPLICATION_CREDENTIALS='****'

Next time when you launch console session, these settings will take effect

Terraform – difference between data.aws_iam_policy_document and in-line JSON policy

So I’ve got this block of terraform code, which simply just allow the role to assume role

data "aws_iam_policy_document" "bootstrap_role" {
  statement {
    actions = ["sts:AssumeRole"]

    principals {
      type        = "Service"
      identifiers = ["ec2.amazonaws.com"]
    }
  }
}

resource "aws_iam_role" "bootstrap" {
  name               = "bootstrap-${random_string.bucket.result}"
  assume_role_policy = data.aws_iam_policy_document.bootstrap_role.json
}

When check in AWS Console, I can see following Trust relationships created with:
“Sid”: “”

When I would create the role in AWS Console, I would not have this section:
“Sid”: “”

Tried to update the terraform code to following, and it made no difference:

data "aws_iam_policy_document" "bootstrap_role" {
  statement {
    actions = ["sts:AssumeRole"]

    principals {
      type        = "Service"
      identifiers = ["ec2.amazonaws.com"]
    }

    sid = null
  }
}

resource "aws_iam_role" "bootstrap" {
  name               = "bootstrap-${random_string.bucket.result}"
  assume_role_policy = data.aws_iam_policy_document.bootstrap_role.json
}

After some research, I’ve settled with this code with incline JSON policy instead

resource "aws_iam_role" "bootstrap" {
  name = "bootstrap-${random_string.bucket.result}"
  assume_role_policy = jsonencode(
    {
      "Version" : "2012-10-17",
      "Statement" : [
        {
          "Effect" : "Allow",
          "Principal" : {
            "Service" : "ec2.amazonaws.com"
          },
          "Action" : "sts:AssumeRole"
        }
      ]
    }
  )
}

Now it’s nice and clean