When working with your customer or partners, often time you will need to exchange files. Sending files via email might not be as secure. If you have an Azure subscription and you may utilize Azure Storage Account SFTP feature to allow secure file transfer.
Create Azure Storage Account
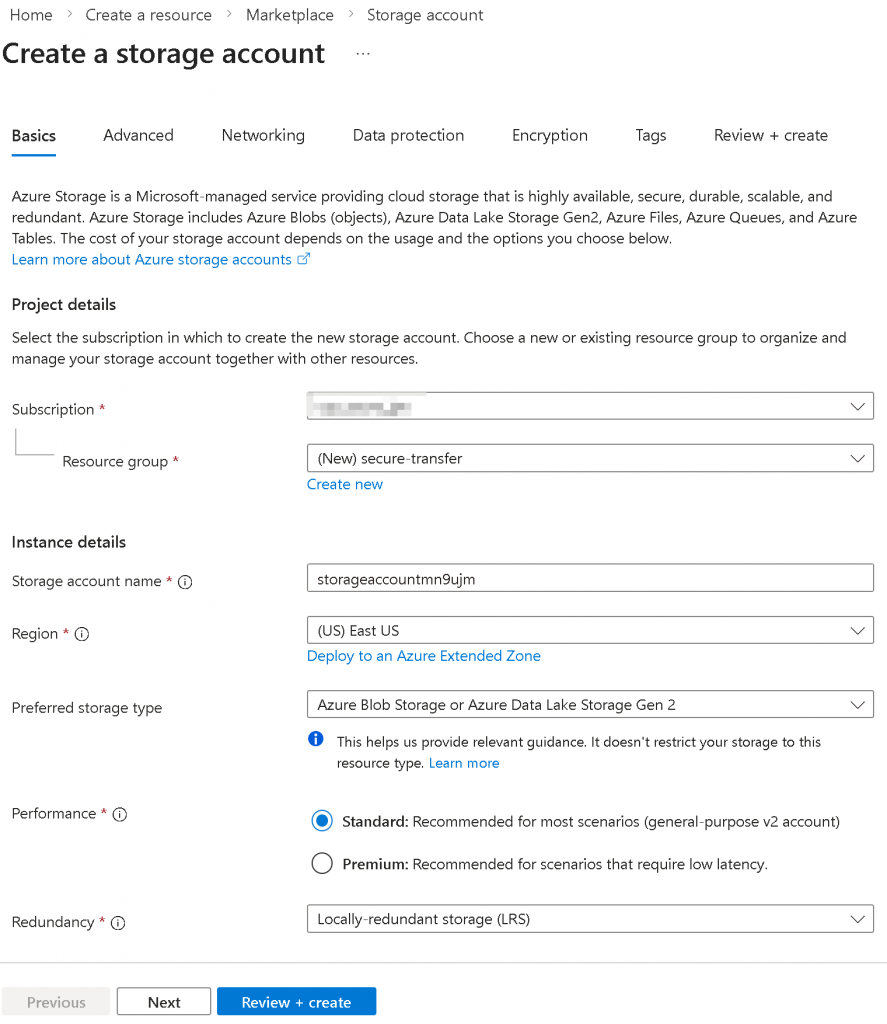
In following example, I’m creating a Azure Blob Storage or Azure Data Lake Storage Gen 2 LRS storage account storageaccountmn9ujm in East US, click on next
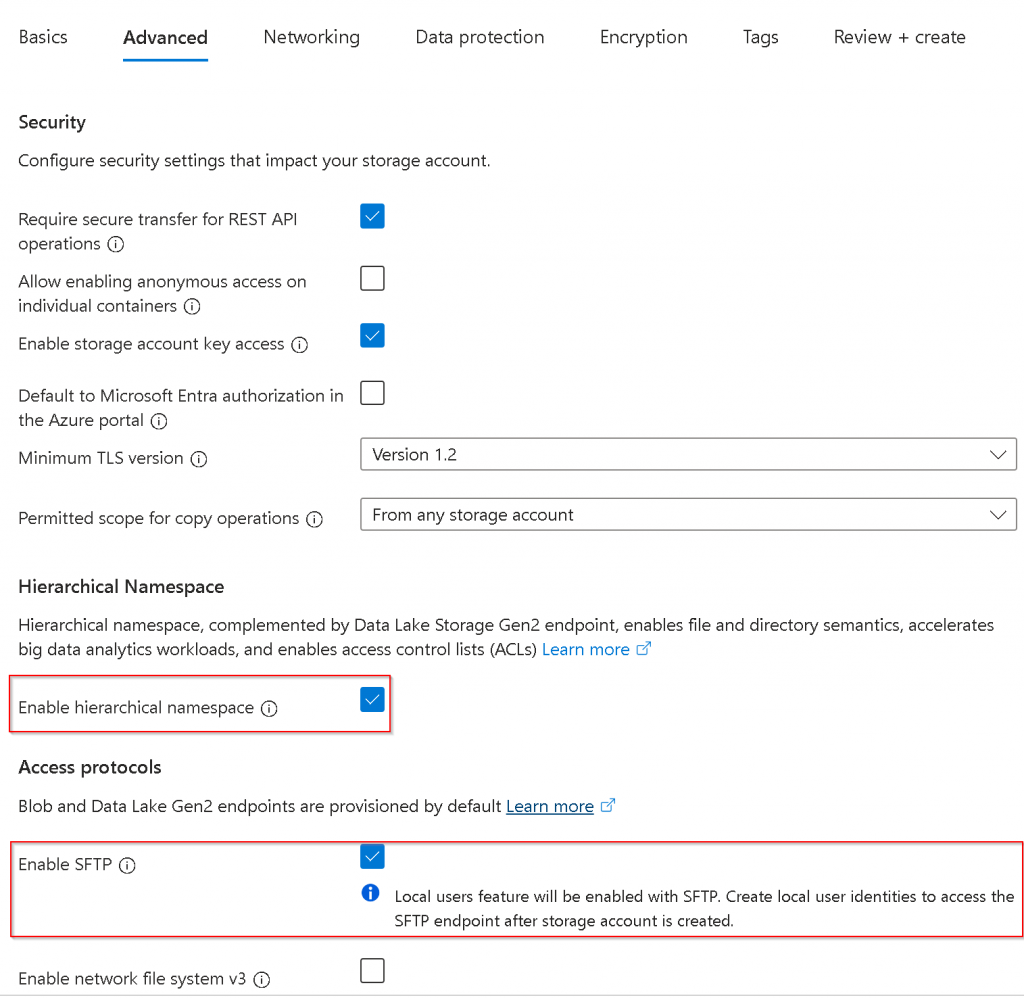
In the Advanced tab, select Enable hierarchical namespace, then select Enable SFTP
Select Review and Create
Create local SFTP account and assign permission
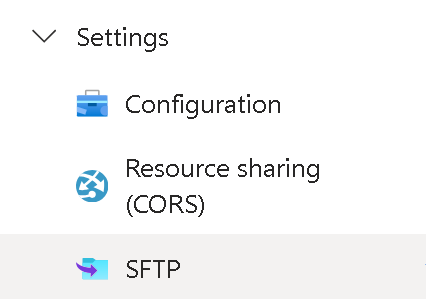
Once the storage account is created, go to the storage account -> left side panel -> Settings -> SFTP
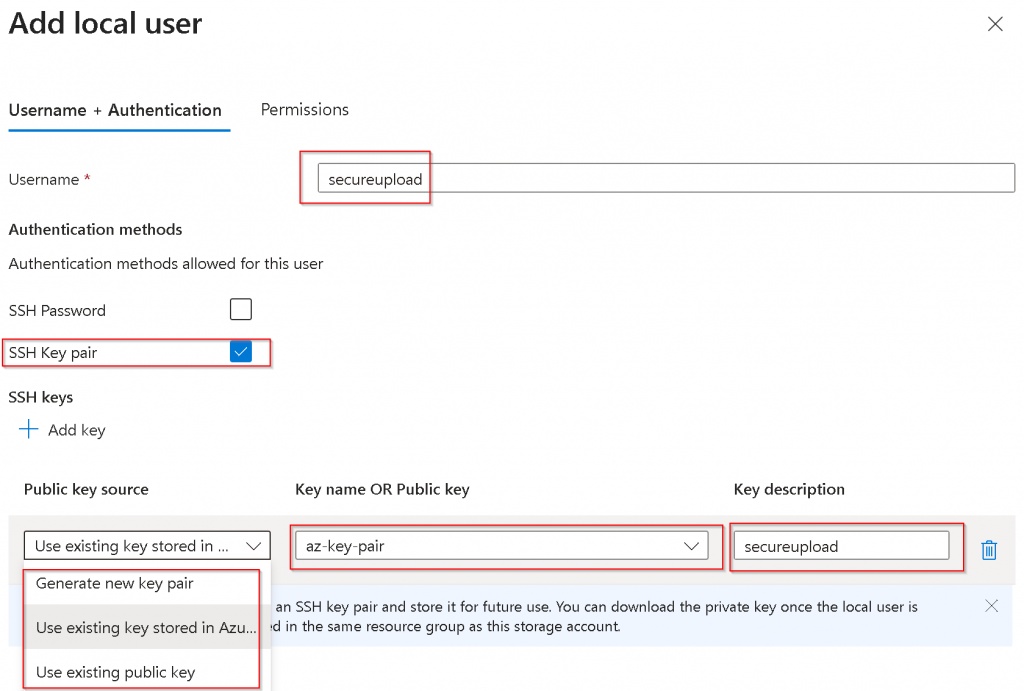
Click Add local user
Specify Username I’d pick SSH Key pair over SSH password for additional security You have a choice to either
Generate new key pair
Useful when you intend to use this SFTP for yourself, and you didn’t already have a key pair, Azure will generate public key and private key, it will store the public key, and prompt you to download the private key
Use existing key stored in Azure
Useful when you already have key pairs, and uploaded the public key into Azure. Since I already have public key uploaded, I’m selecting this option for demo purpose
Use existing public key
You may ask your customer / partner of their public key, then enter in Key name OR Public key section
Always remember to provide a description to the key for future references
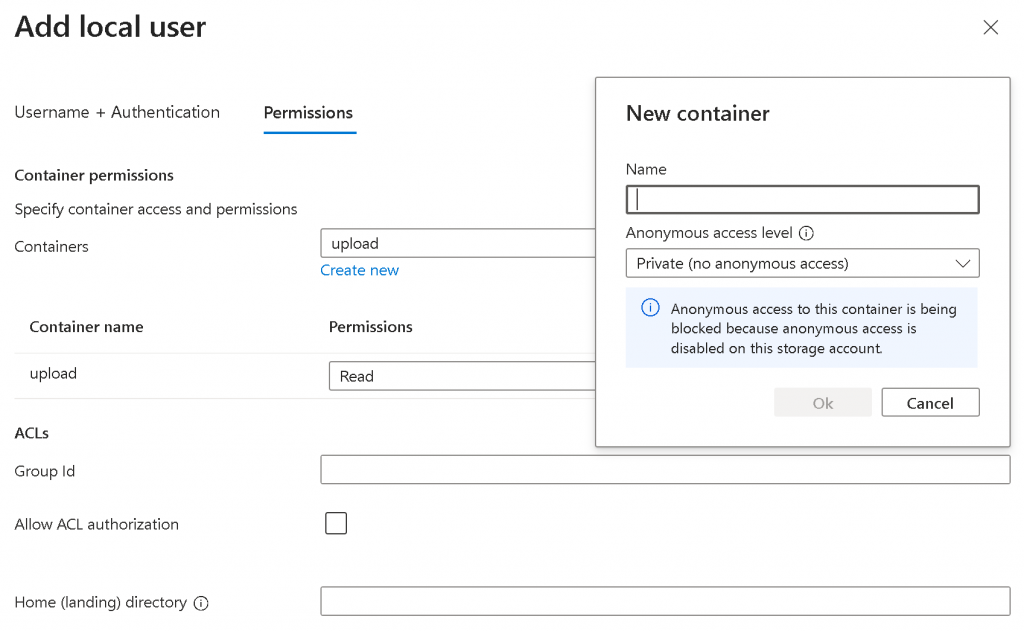
Switch to Permissions tab
First Containers -> Create new -> Create a container for storing the uploaded files. Note, by default the container is Private
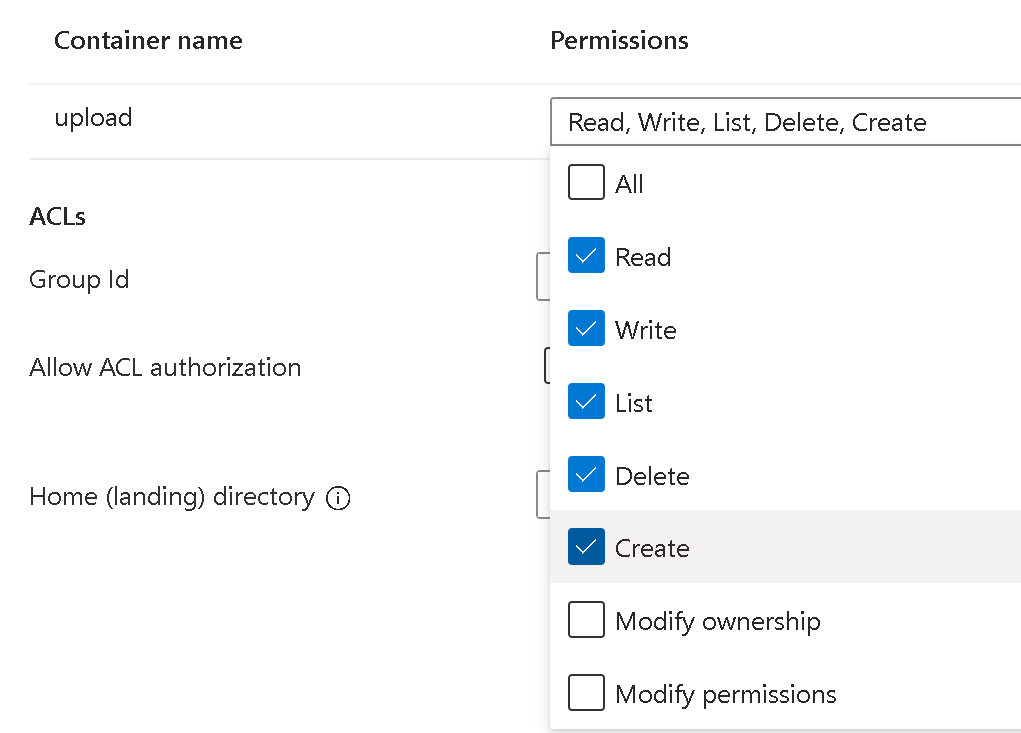
Give permission to the local user for the container.
If you want the user to go directly to your container, then specify the container name as the Home (landing) directory
Click on Add, you will see the local user gets created, pay attention to the Connection String
How customer / partner upload files
You will need to provide Connection string to your customer / partner, in my example: storageaccountmn9ujm.secureupload@storageaccountmn9ujm.blob.core.windows.net
Customer / partner will then goes to command prompt
sftp -i <private_key> <connection_string>
For example below, after add the new connection to list of known hosts, you will be at sftp> prompt
To send a file
put <local_file_path> <remote_file_name>
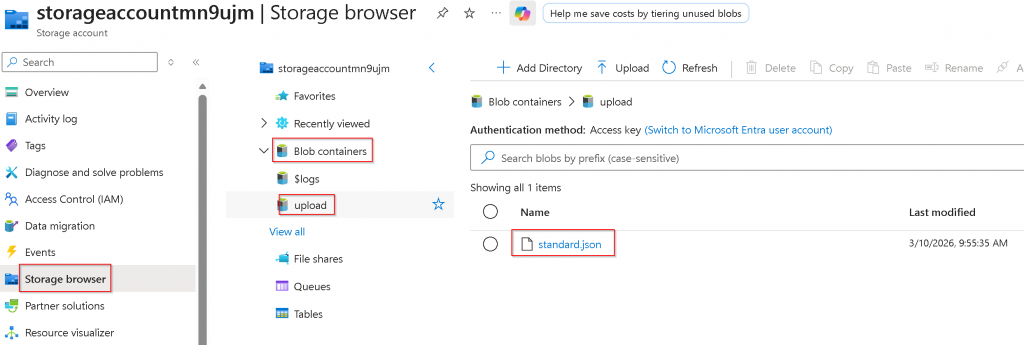
Validate file uploaded
Storage account -> Storage browser -> Blob Containers -> <container> -> check if the file is there
In Azure/AWS when you are peering two vNets/VPCs, each end will automatically learn the opposite side CIDR ranges assigned to vNets/VPCs subnets. It will not bring over User Defined Route (UDR) in Azure , neither will it bring over the static/propagated routes in AWS.
In GCP VPC peering, it has this very interesting export/import feature that enriches what routes can be exposed across VPC peering, and it can be confusing for people come from Azure/AWS background, and hope this blog will help to clarify this export/import feature, as well as potential gochas.
Lab setup
In this example, I’m creating two VPCs
producer-vpc (services will be running in this producer-vpc, such as Cloud SQL or Filestore)
consumer-vpc1 (this VPC hosts VM or GKE cluster that consumes services provided by producer-vpc)
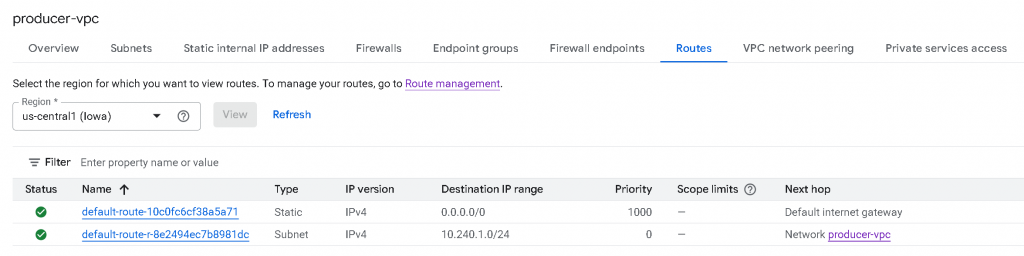
producer-vpc configuration
producer-vpc only have a single subnet with CIDR 10.240.1.0/24 assigned
producer-vpc now only have two active routes: 0/0 -> Internet Gateway, type static, untagged (Scope limits column empty), priority 1000 (For internet egress) 10.240.1.0/24 -> Network producer-vpc, type subnet, untagged (Scope limits column empty), priority 0. (Local routes for it’s own subnets)
consumer-vpc1 configuration
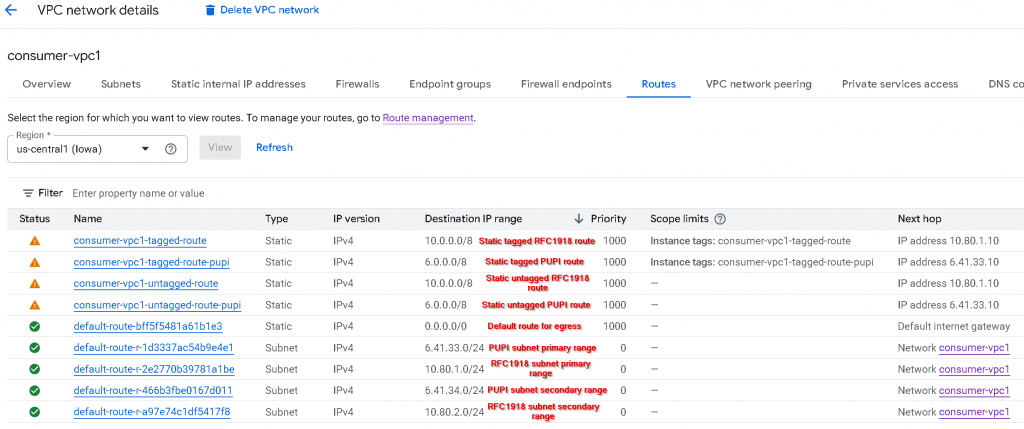
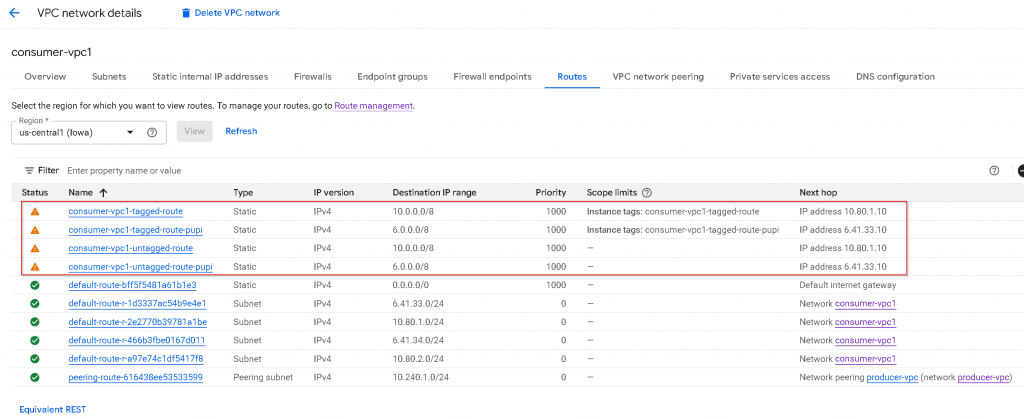
In consumer-vpc1, I have created two subnets, each subnet also assigned secondary IP range (for services that might use secondary IPs, such as GKE pods), also I’ve used IP address that either fall within RFC1918 (10.0.0.0/8, 172.16.0.0/12, 192.168.0.0/16), or Non-RFC1918 address range 6.0.0.0/8
pupi-subnet1 primary IP range: 6.41.33.0/24, secondary IP range: 6.41.34.0/24 rfc1918-subnet1 primary IP range: 10.80.1.0/24, secondary IP range: 10.80.2.0/24
You might have noticed this name: PUPI, it refer to: Privately Used Public IP. Meaning you are using a public IP range for private use. More to come on this.
These are the route tables of consumer-vpc1: The top 4 rows are static routes added by me. It has a mixture of Static tagged RFC1918 route, Static tagged PUPI route, Static untagged RFC1918 route, Static untagged PUPI route. The 5th row is default route for egress The 6th to 10th are subnet routes that are: PUPI subnet primary IP range, RFC1918 subnet primary IP range, PUPI subnet secondary IP range, RFC1918 subnet secondary IP range
VPC peering
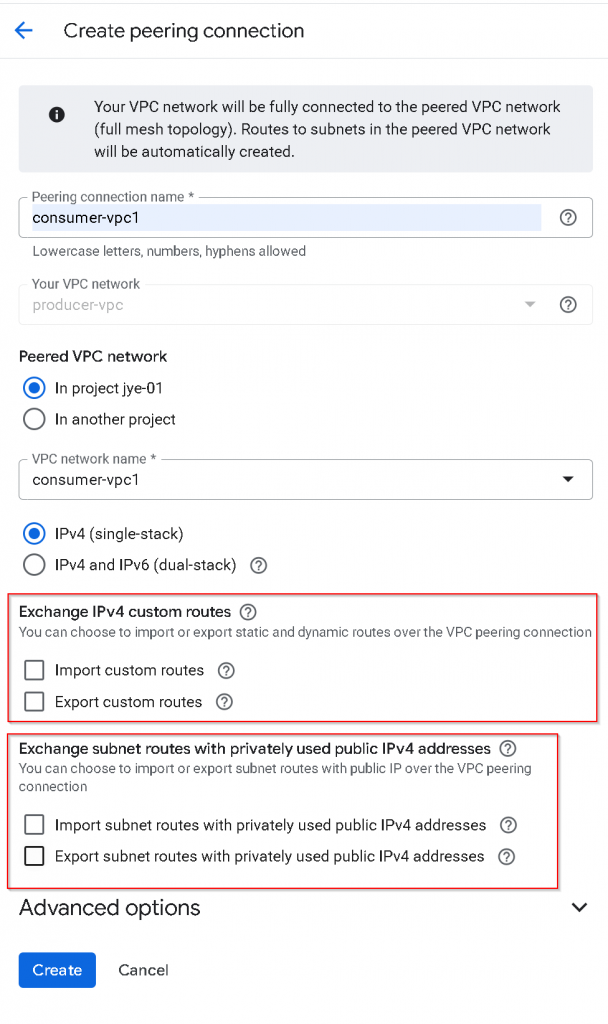
We will need to create VPC peering from consumer-vpc1 -> producer-vpc Then we will have to create the reverse VPC peering from producer-vpc -> consumer-vpc1
For the VPC peering from consumer-vpc1 -> producer-vpc, I’ve unchecked Exchange IPv4 custom routes, also unchecked Exchange subnet routes with privately used Public IPv4 address
Do the same to create the reverse VPC peering from producer-vpc -> consumer-vpc1
Observe route tables after initial VPC peering
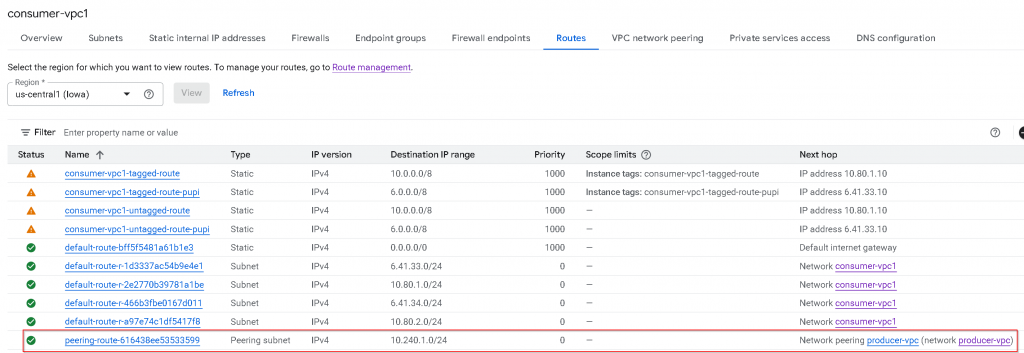
After the status of both VPC peerings turned to Active
In consumer-vpc1, we can see type: Peering subnet, destination 10.240.1.0/24, priority 0, untagged, next hop -> Network peering producer-vpc
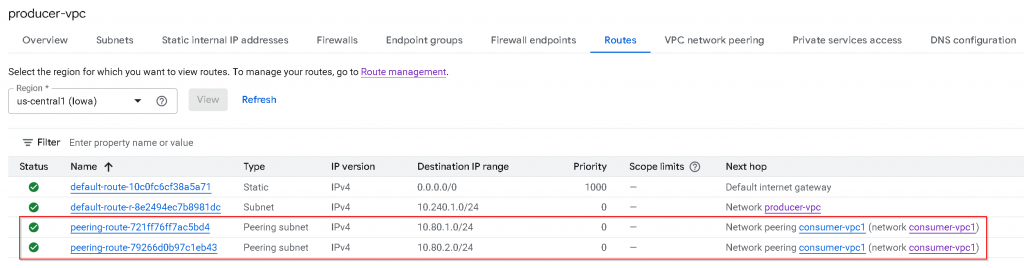
In producer-vpc, we can see only RFC1918 subnet routes shows up as Peering subnet. The PUPI subnets routes didn’t show up.
As a reminder, this is the subnets CIDR assignment for consumer-vpc1, the 6.41.x.x routes didn’t get added to producer-vpc route table via VPC peering.
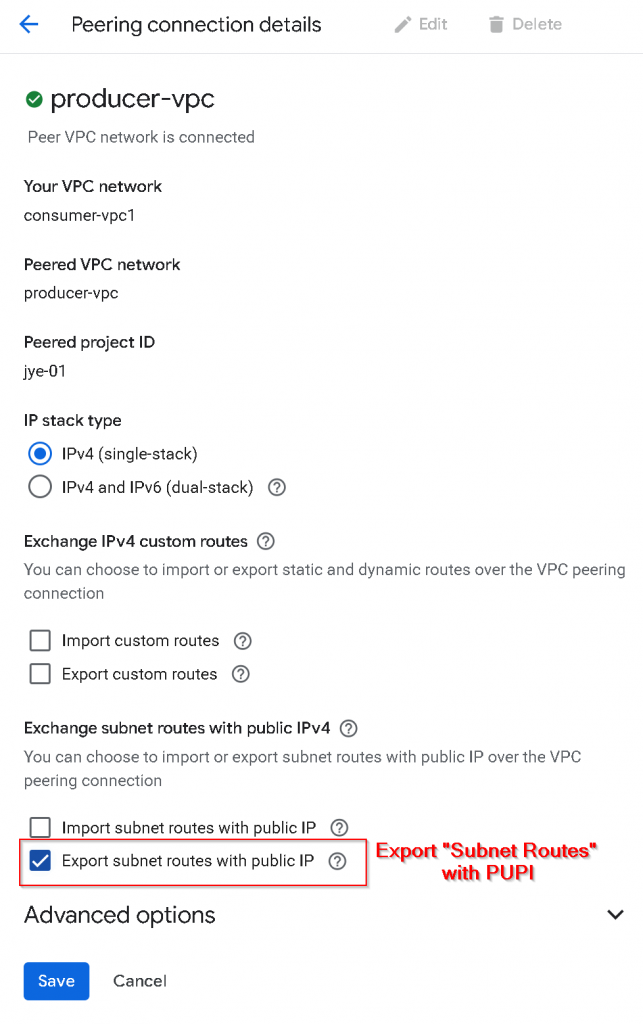
Export / Import “Subnet routes” with PUPI
To allow “Subnet routes” that are using PUPI, eg, the pupi-subnet1 that are using 6.41.33.0/24 and 6.41.34.0/24 addresses to be exported to producer-vpc:
First, update VPC peering from consumer-vpc1 -> producer-vpc, check “Export subnet routes with public IP“, or I’m referring it to Export “Subnet routes” with PUPI
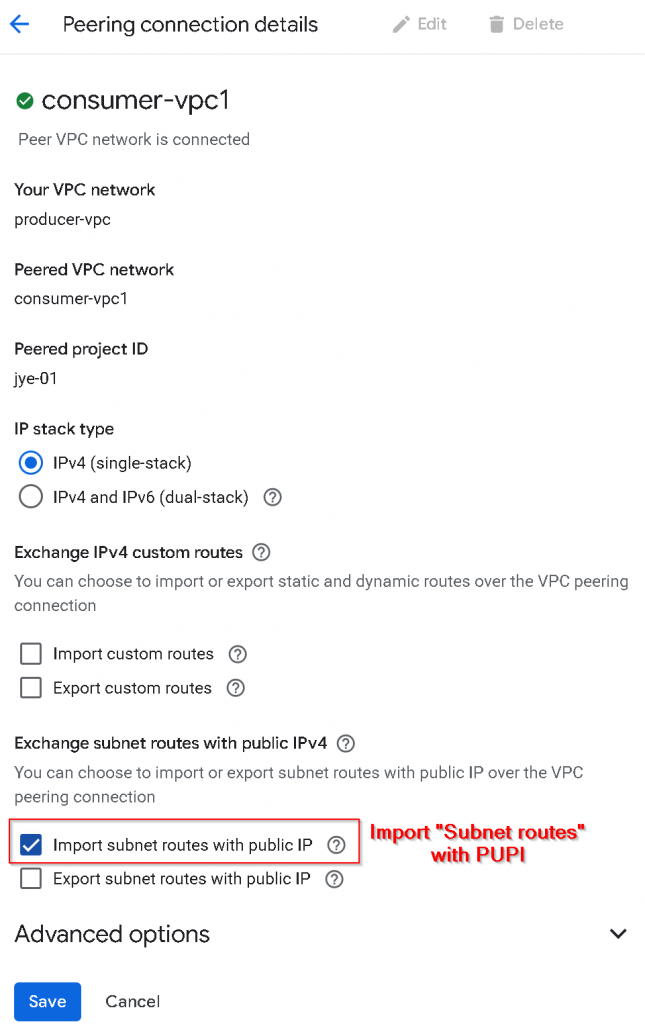
2nd, update VPC peering from producer-vpc -> consumer-vpc1, check “Import subnet routes with public IP“, or I’m referring it to Import “Subnet routes” with PUPI
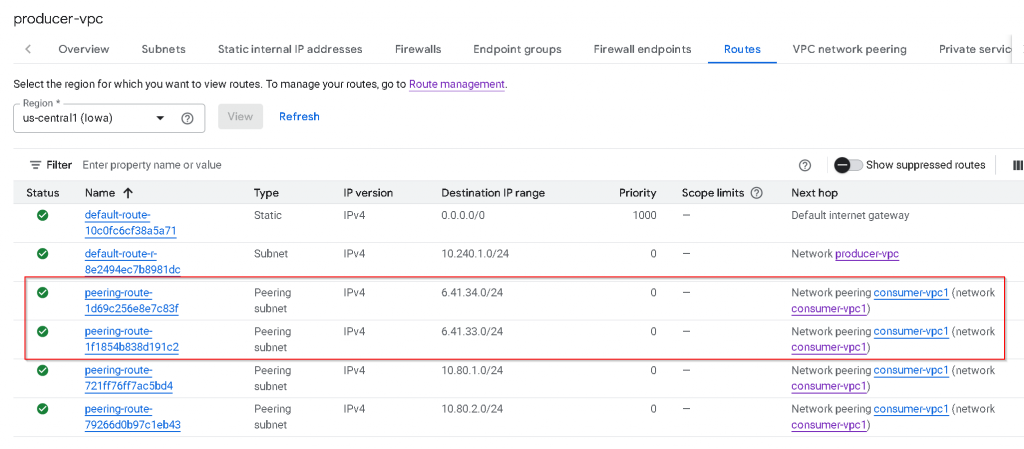
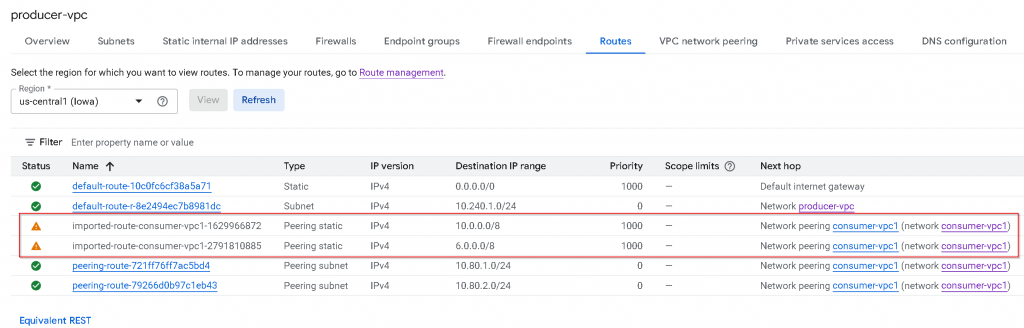
Check producer-vpc route table, now we can see PUPI subnets 6.41.x.x show up as peering subnet routes.
Why this is important?
Coming from Azure/AWS, the assumption is that peering VPCs will automatically learn all subnet routes across the peering connection. In GCP, this isn’t the case. You will have to enable “Export/Import subnet routes with public IP“, or I’m referring it to Export/Import “Subnet routes” with PUPI, to have the same effect.
When you are using PUPI in your consumer VPC as you ran out of RFC1918 ranges, when you are connecting to PaaS services such as Cloud SQL, Filestore, you need to make sure Export/Import “Subnet routes” with PUPI is enabled on the VPC peering connection.
What is “Custom routes”
1. Static Routes
These are manually created by you. You define a destination CIDR range and a “next hop” (where the traffic should go).
Common Use Case: Sending traffic through a third-party firewall appliance or a VPN gateway.
Next Hops: Can be an IP address, a specific VPN tunnel, or a VM instance.
2. Dynamic Routes
These are managed by Cloud Router using the BGP (Border Gateway Protocol). You don’t type in the paths manually; instead, your VPC “learns” them from another network.
Advantage: If a link goes down, the route updates automatically without you needing to click anything.
Common Use Case: Connecting your on-premises data center to GCP via Cloud Interconnect or Cloud VPN.
Export / import custom routes
First, update VPC peering from consumer-vpc1 -> producer-vpc, uncheck “Export subnet routes with public IP“, or I’m referring it to Export “Subnet routes” with PUPI, check “Export custom routes
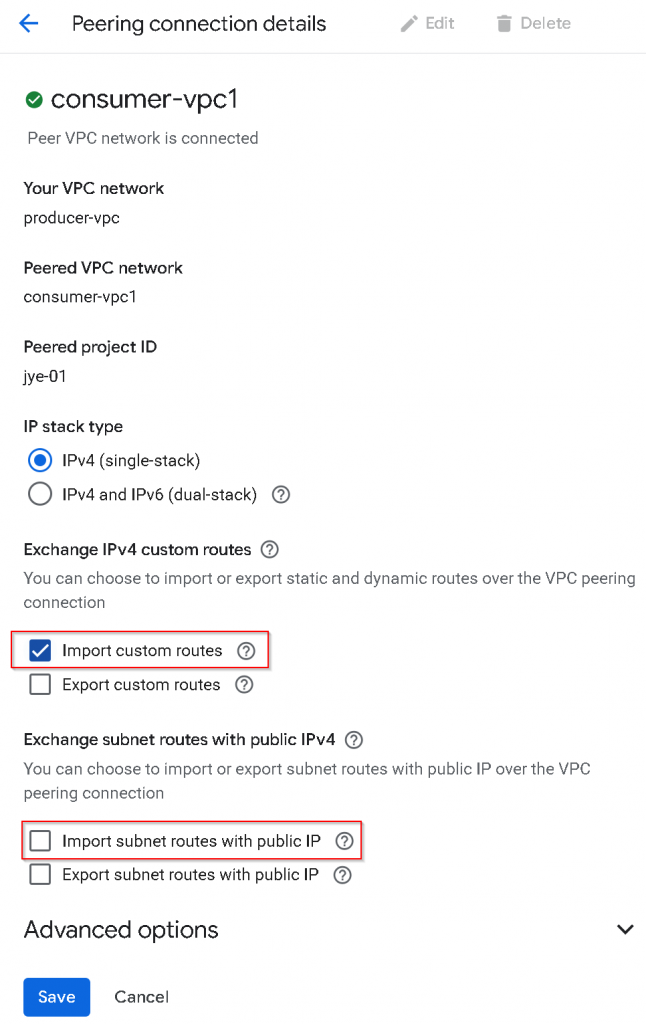
2nd, update VPC peering from producer-vpc -> consumer-vpc1, uncheck “Import subnet routes with public IP“, or I’m referring it to Import “Subnet routes” with PUPI, check “Import custom routes“
After setting is applied, consumer-vpc1 export custom routes, and producer-vpc import custom routes.
Now check producer-vpc route table
Comparing with consumer-vpc1 route table. You will notice:
All *untagged* custom routes (static in the example, dynamic route not shown) are imported
Untagged Custom route with PUPI 6.0.0.0/8 also got imported
Tagged custom routes are *not* exported / imported
Default internet gateway routes are *not* exported/imported
Note: Policy-based routes (PBR) will *not* exported /imported (not shown in the example)
Why this is important?
Allowing untagged custom routes to be exported can allow traffic to be directed to a routing device across VPC peering, this routing device can be Cloud Router, Firewall etc.
Be careful when you are using 0/1 or 128/1 untagged custom routes in your consumer VPC, as when you are peering with producer VPC and exchanging custom routes, the 0/1 or 128/1 untagged custom routes may get imported into producer VPC, which may break PaaS services internet egress
Wrapping up
Export / Import custom routes are used for Custom routes such as static/dynamic routes, regardless if it’s using PUPI or not.
“Export/Import subnet routes with public IP” are targeting Subnet routes that are using PUPI, it has nothing to do with Custom routes.
Many businesses are using Equinix as global provider of secure data centers and high-speed interconnection services. Aviatrix customers are interested in leveraging Equinix to connect to other partners via secure and highspeed private connections. In this blog, I will show you how to connect Azure Express Route Circuit with Aviatrix Edge as Transit (Virtual Device) in Equinix, when IPSec encryption isn’t required on the ER circuit to Aviatrix Edge as Transit.
Steps needed:
Create Express Route (ER) Circuit in Azure Portal
Create Edge as Transit (EAT) in Equinix
Use the ER Circuit service key to create Express Route connection towards the EAT interfaces
Configure Azure Private Peering with unique VLAN ID.
Wait Equinix update Destination VLAN tag (if this never happens then you might have a stale VLAN ID on the port, contact Equinix support to resolve it)
Confirm Layer 2 connectivity between ER Microsoft Enterprise Edge Router (MSEE) and EAT
Establish BGP over LAN connection between MSEE and Aviatrix EAT
Connect the Express Route Circuit with Express Route gateway for your Azure vNet hub or vWAN.
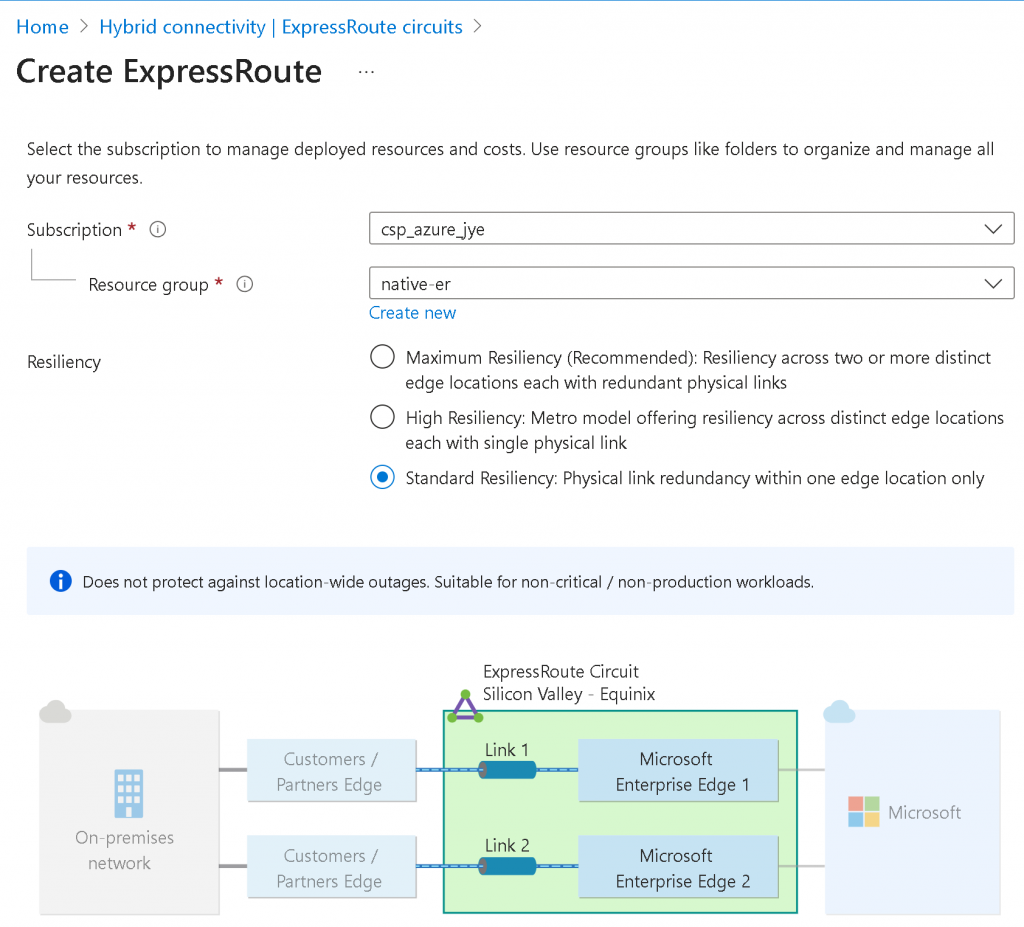
Create Express Route (ER) Circuit in Azure Portal
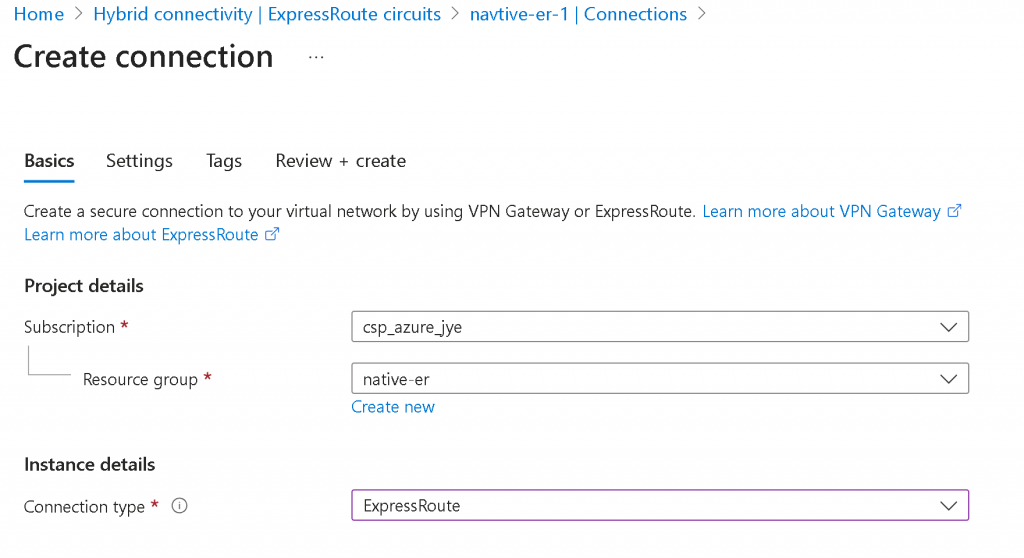
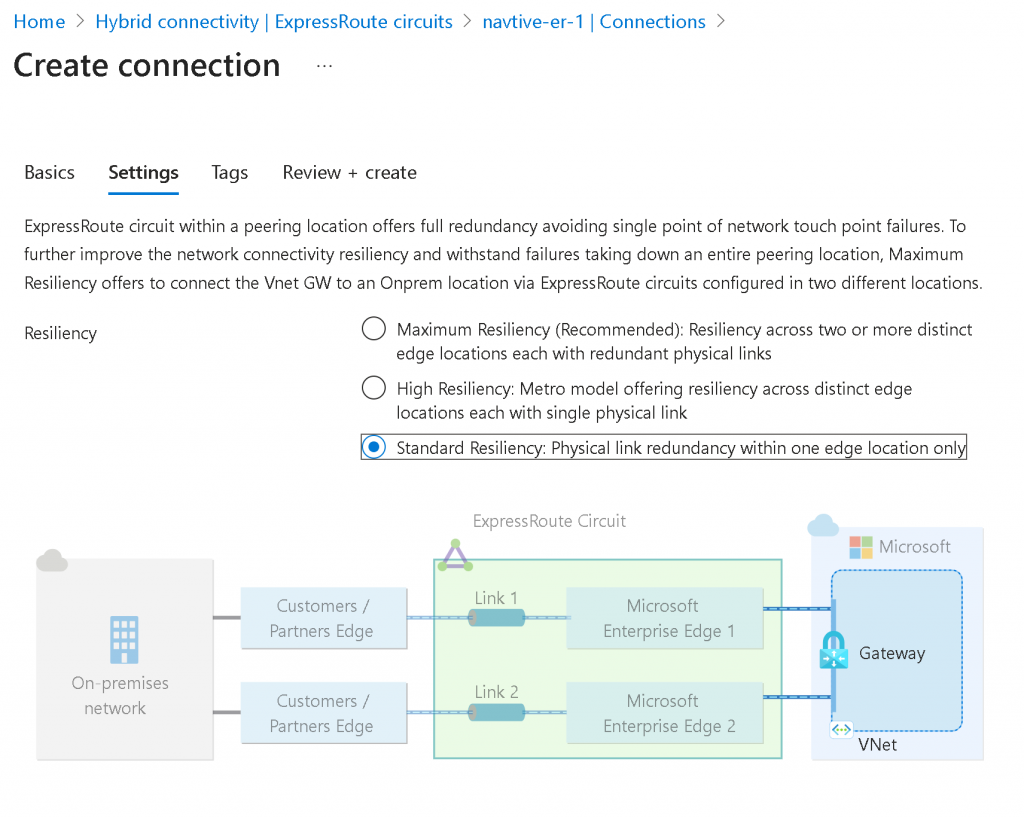
In Azure Portal, search for ExpressRoute circuits, click on create, select your Subscription and Resource Group, select Standard Resilience if the connection is only coming from a single Equinix location
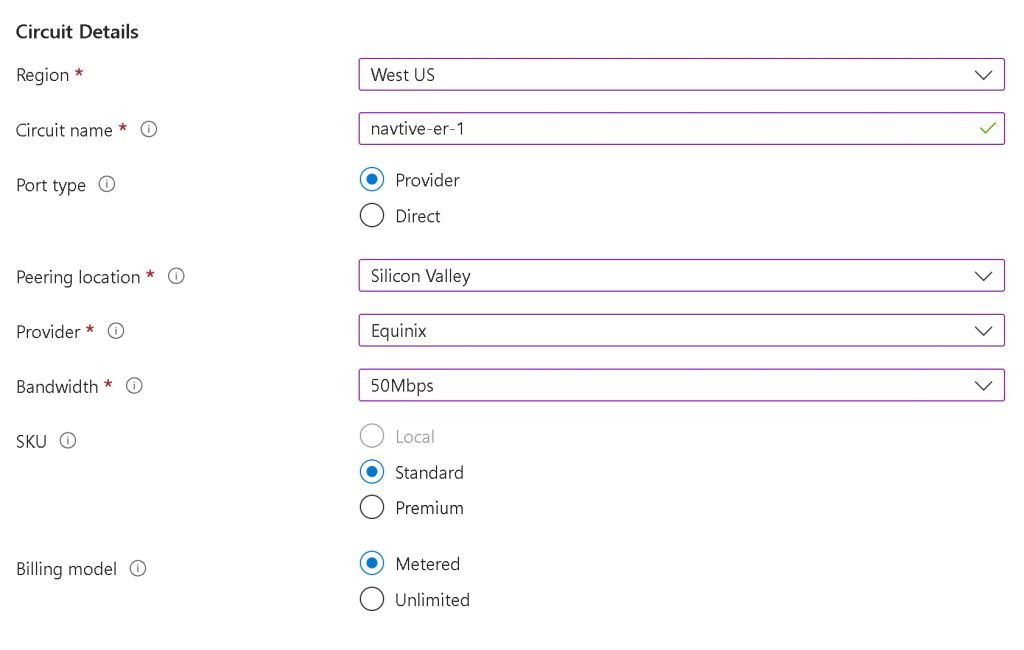
Provide Region, Circuit Name, Port Type (Provider in this case), Peering Location, Provide (Equinix), Bandwidth, SKU and Billing model
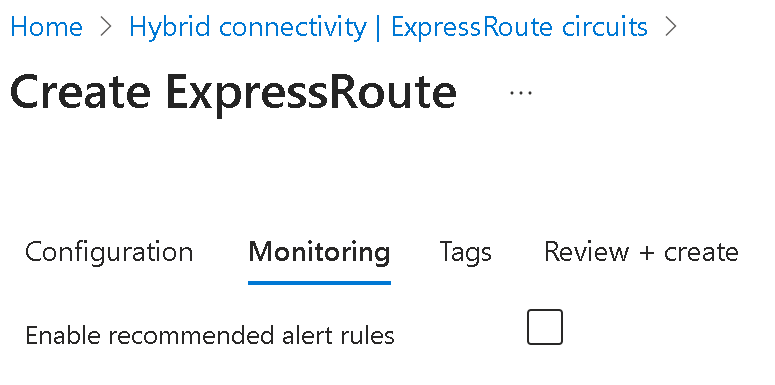
You may choose to Enable recommended alert rules and provide Tags in the next two steps, then Review + Create
Caution: If you will use Equinix Internet Access, then you cannot choose your own ASN for EAT, as Equinix Internet Access will assign a private ASN to you for the Internet Access BGP connection, as in my lab worksheet, the 64516 was assigned by Equinix as WAN2/eth3 is connected to Equinix Internet Access (I will create a blog just for this topic)
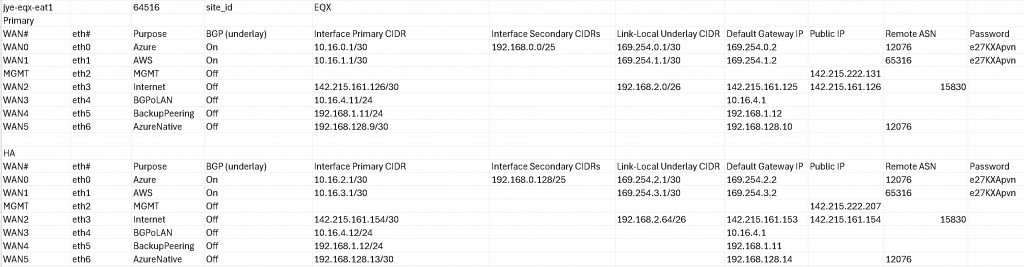
You will need to Plan each interfaces configuration as needed. Note that EAT reserves eth2 for Management port, hence WAN port number doesn’t always align with eth port number. Example worksheet I used for lab planning:
For this example, we will use WAN5/eth6 for Azure ER connection, note BGP (underlay) is set to Off. The primary CIDR/default Gateway need to be in the same /30 range, and Azure MSEE will always use the 2nd IP. Also note the MSEE always have 12076 as AS number.
Example of WAN5/eth6 configuration
Use the ER Circuit service key to create Express Route connection towards the EAT interfaces
In the newly created ER Circuit, copy the Service key string
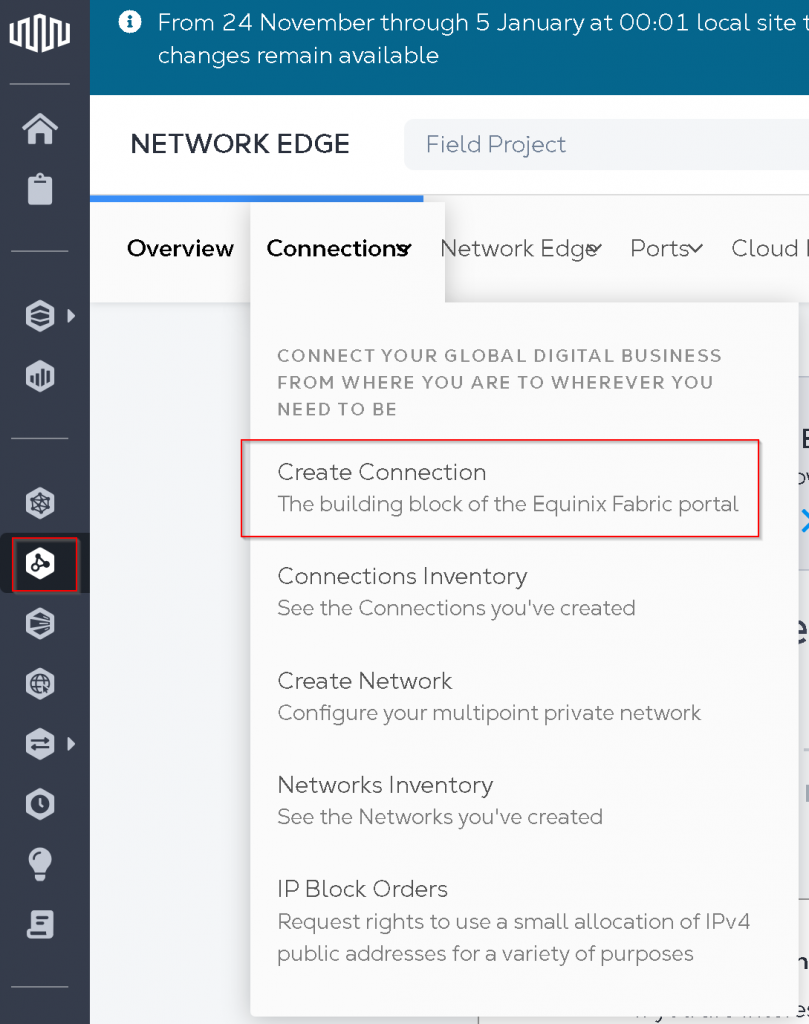
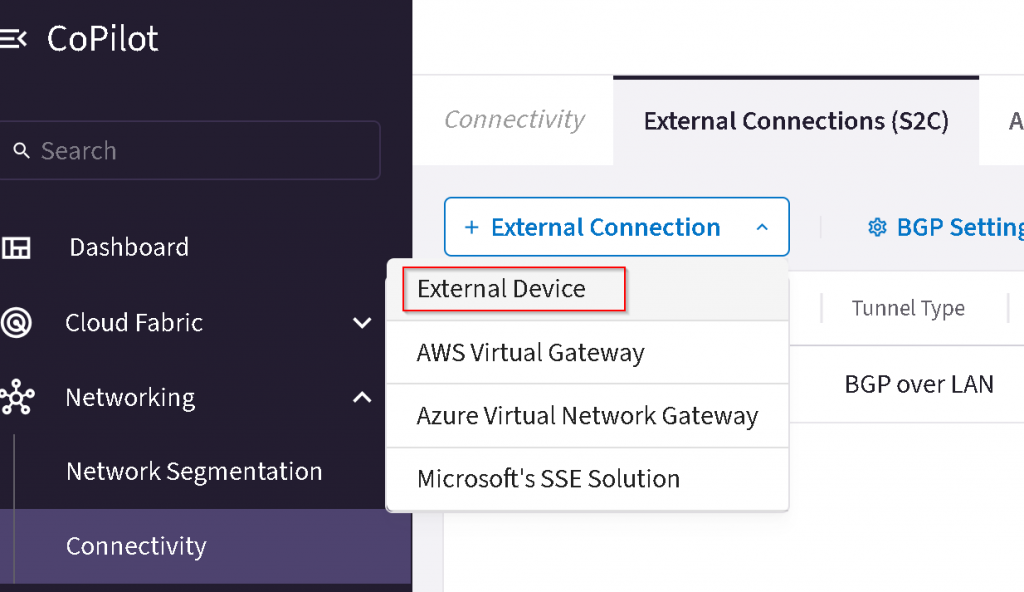
In Equinix Portal, select Connections -> Create Connection
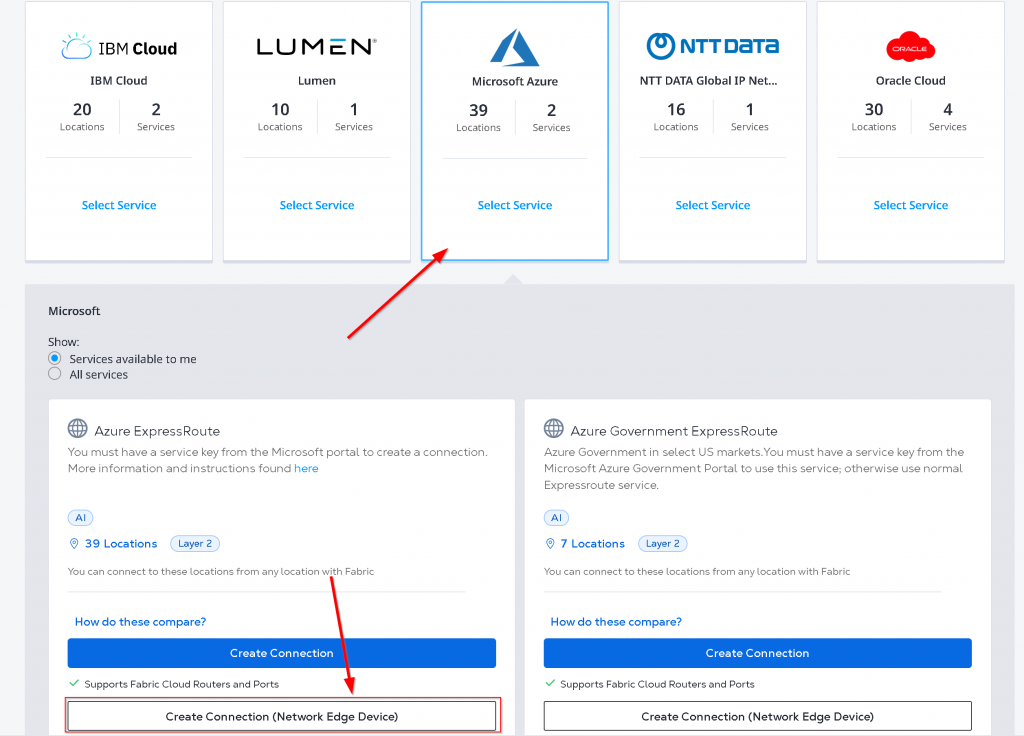
Find Microsoft Azure -> Select Service -> Create Connection (Network Edge Device)
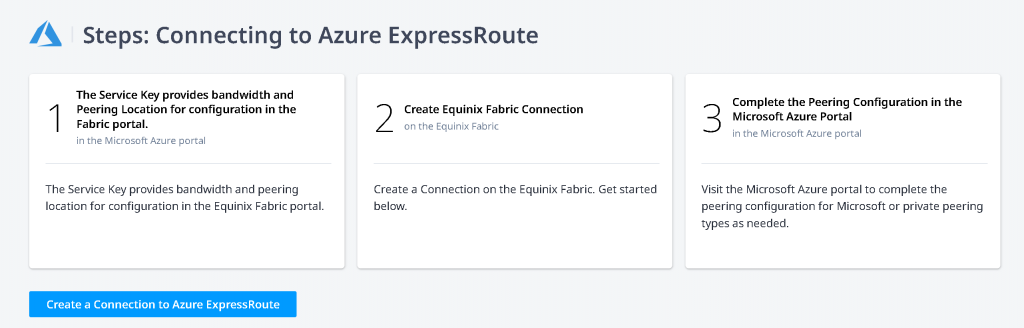
Click on Create a Connection to Azure Express Route
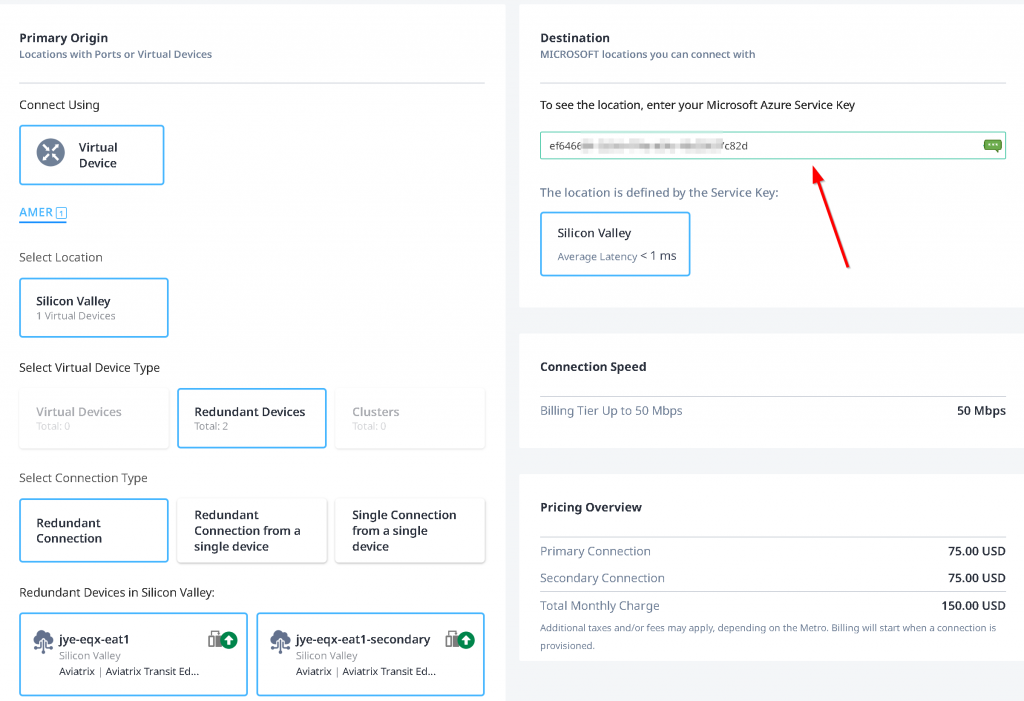
Select Virtual Device -> Location -> Virtual Devices (without HA), Redundant Device (with HA, EAT is always Active/Active), Cluster (doesn’t apply as it’s Active/Standby) -> Select EAT device -> Enter ER Circuit Service Key copied from last step -> Equinix will validate the key, if it’s valid you can click on Next
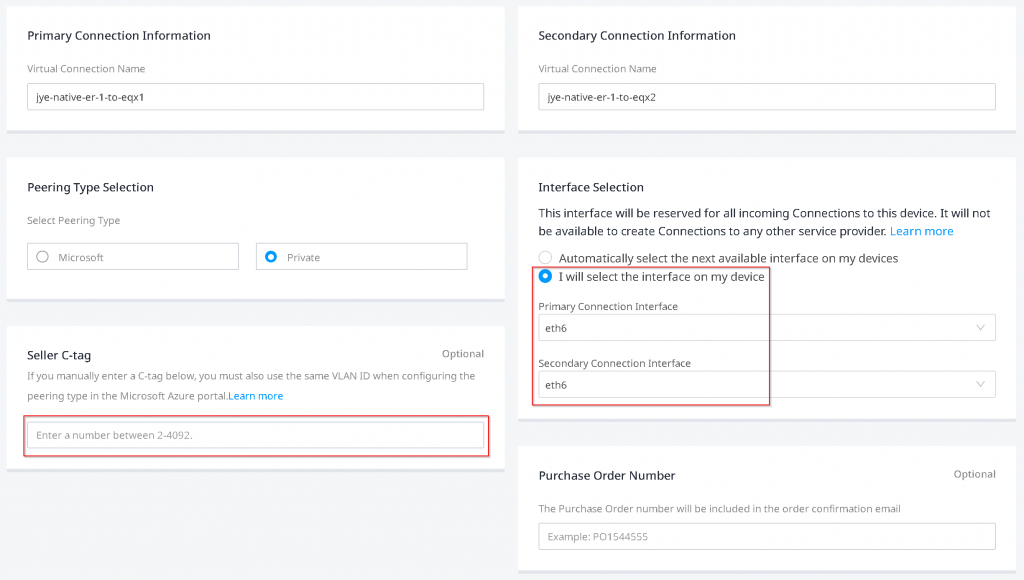
I have been struggling with Seller C-tag. There’s a high chance of entering a Seller C-Tag causing a conflicting VLAN ID during the connection creation, and when this happens, you will not be able to clean up the connection without engaging Equinix support. Equinix suggest to leave Seller C-Tag empty. Also it’s important to select the interfaces you assigned on EAT devices.
You may review and submit order.
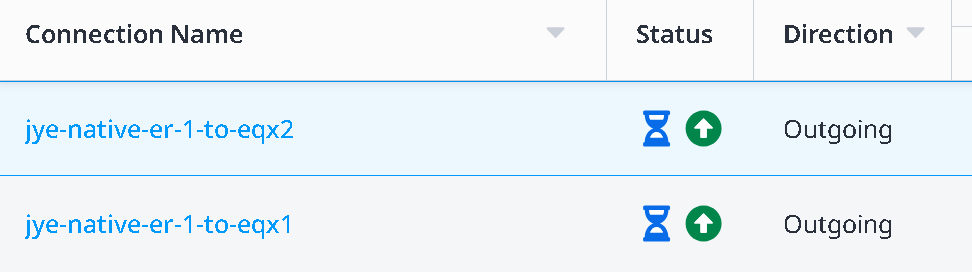
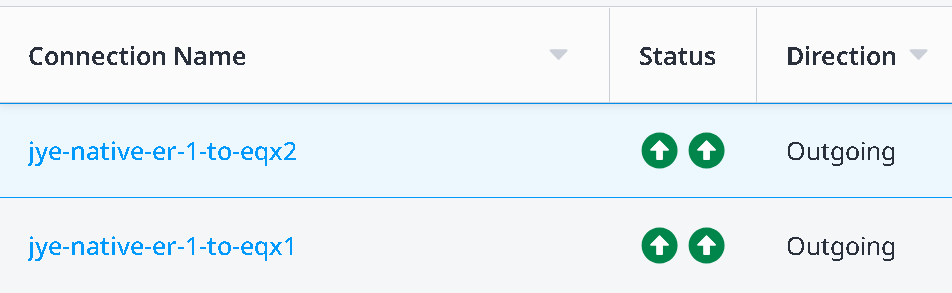
In the Connections -> Connections inventory page, you will see the two newly created connection in provisioning state with blue hour glass icons
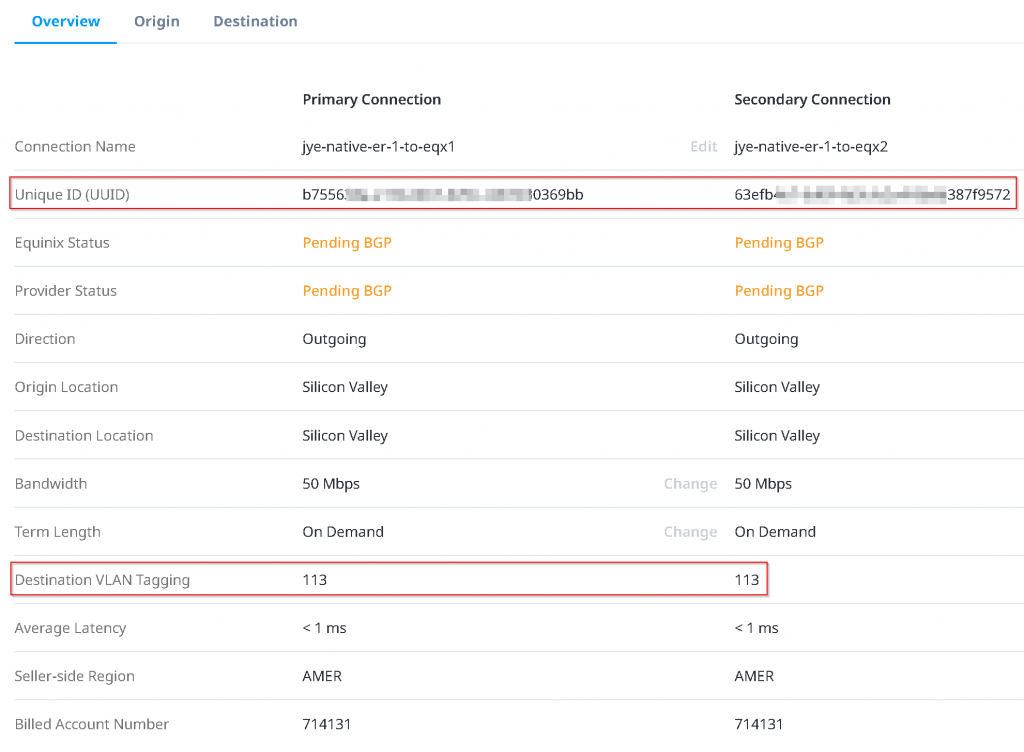
Upon some waiting and refresh on the page, you will see the blue hour glass icons turned into orange triangle with exclamation mark, indicating Pending BGP.
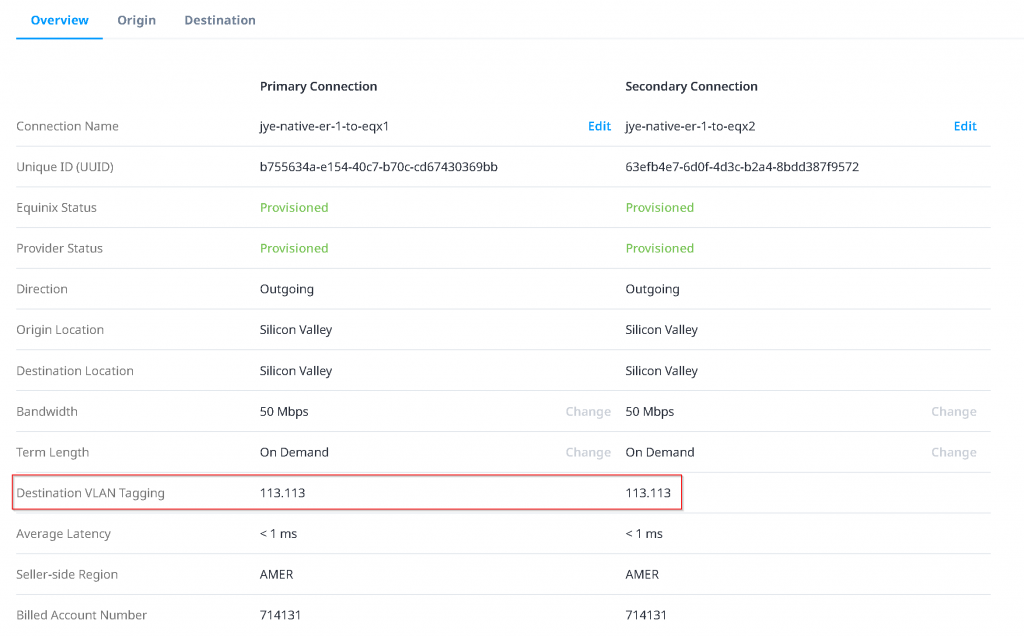
Click on the connection itself, note down the Destination VLAN Tagging ID, for following example: 113. Also note that the Unique ID (UUID) is needed when you open a support ticket with Equinix, if you run into issues.
Configure Azure Private Peering with unique VLAN ID
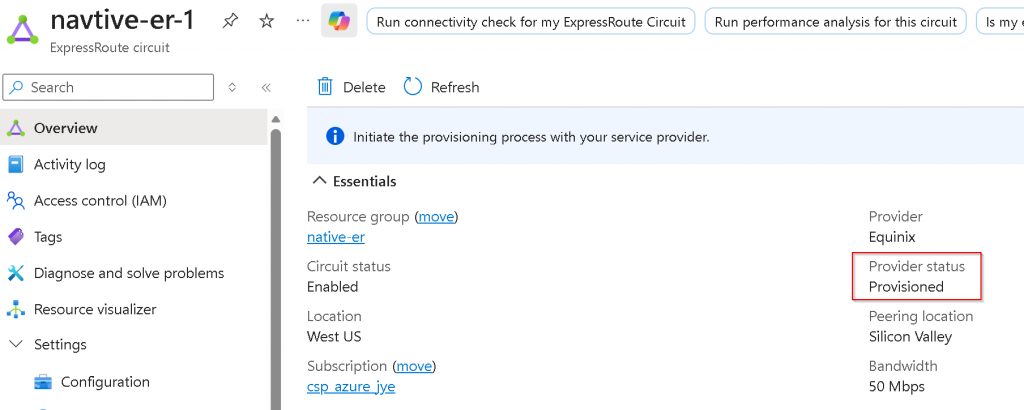
Switch back to Azure Portal, note that the ER circuit Provider status is now Provisioned
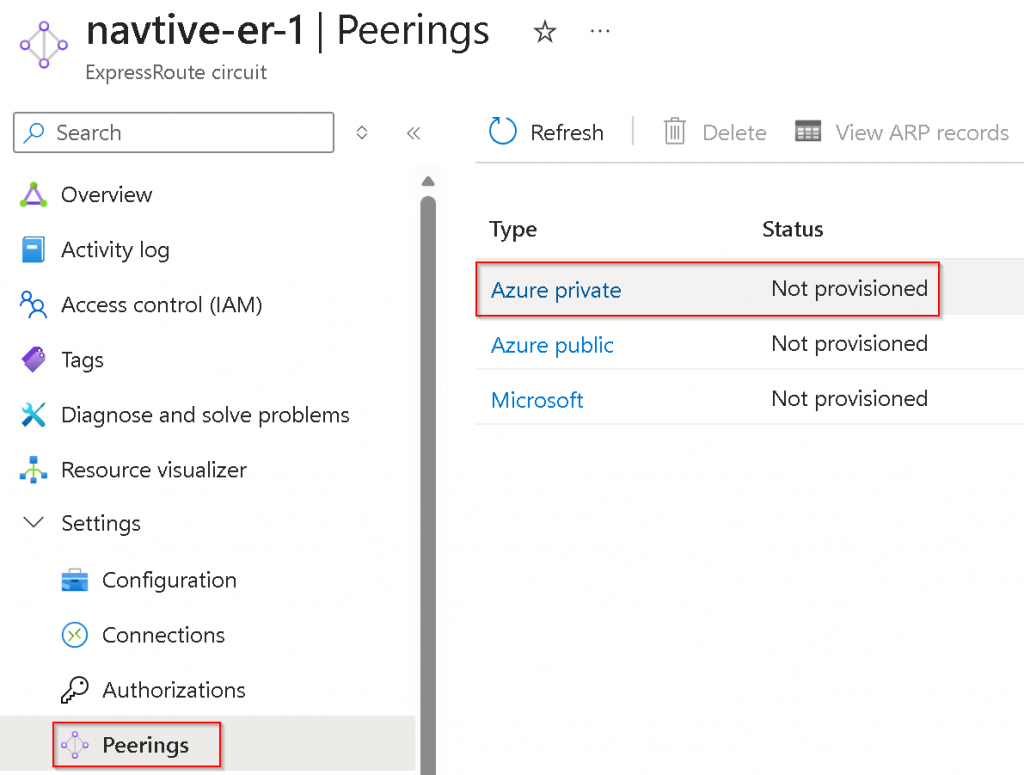
Peerings -> Click on Azure private (notice it’s Not provisioned)
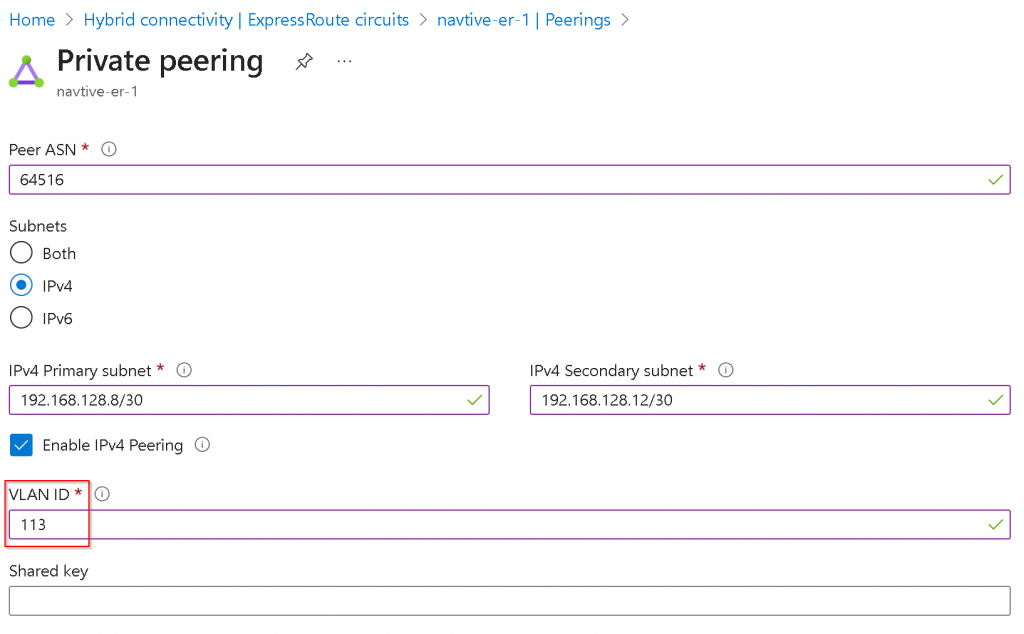
Enter Peer ASN (EAS ASN), Primary/Secondary /30 subnets for the two links, as well as the same VLAN ID from last step Equinix ER connection Destination VLAN Tagging, you may enter BGP MD5 key as Shared key here if you have specified any (With Aviatrix you will have to use terraform aviatrix_transit_external_device_conn resource bgp_md5_key and backup_bgp_md5_key value to set the MD5 key).
Wait Equinix update Destination VLAN tag
Wait for 5 minutes, if you are staring at Equinix portal under Connections -> Connection inventory, you may see popup showing on right side says the connections are provisioned. There seems to have a backend process picking up the changes on Azure Private Peering.
If you refresh on the Connections inventory page, you may see the status gradually change from Equinix (left side blue hour glass) pending – Provider (right side Green up arrow) provisioned
To both Equinix (left side green up arrow) provisioned and Provider (right side Green up arrow) provisioned
Now you click on the connection itself. You may notice the Destination VLAN Tagging change from 113 to 113.113 (where the right side portion is the VLAN ID set on Azure Private Peering). If this never changes, you will need to open support ticket with Equinix to see if the same VLAN ID became stale stuck on the port that need to be clean up.
Confirm Layer 2 connectivity between ER Microsoft Enterprise Edge Router (MSEE) and EAT
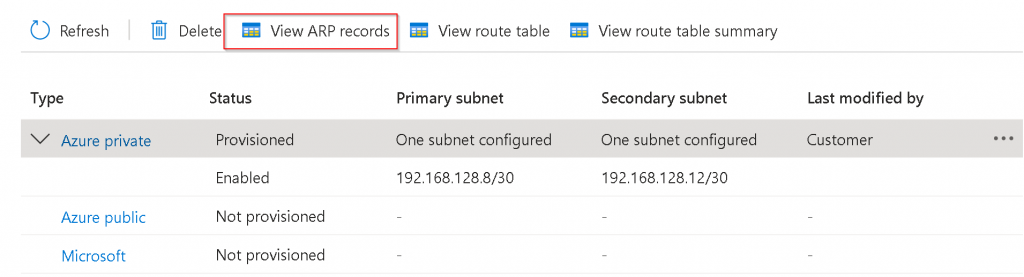
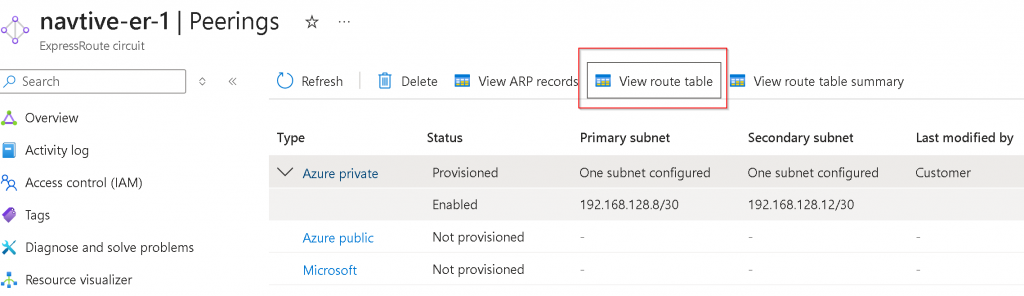
Switch back to Azure Portal -> ER Circuit -> Peerings -> Select Azure private -> View ARP records
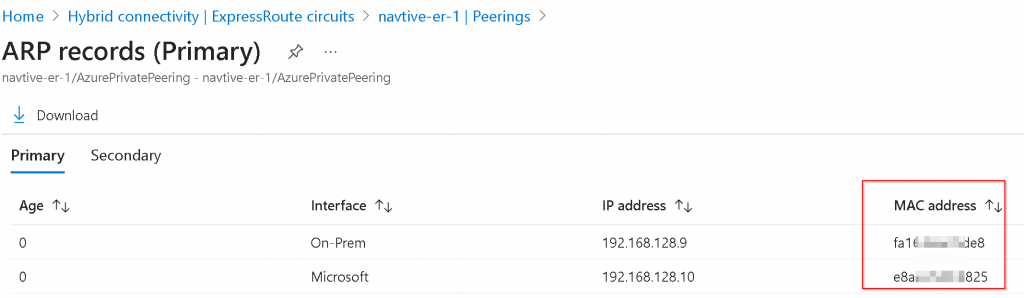
If everything goes well, you should see both MSEE and EAT NIC MAC. If you only see MSEE MAC address: 1. The VLAN configuration didn’t work. 2. You forgot to assign an IP to the interface on EAT
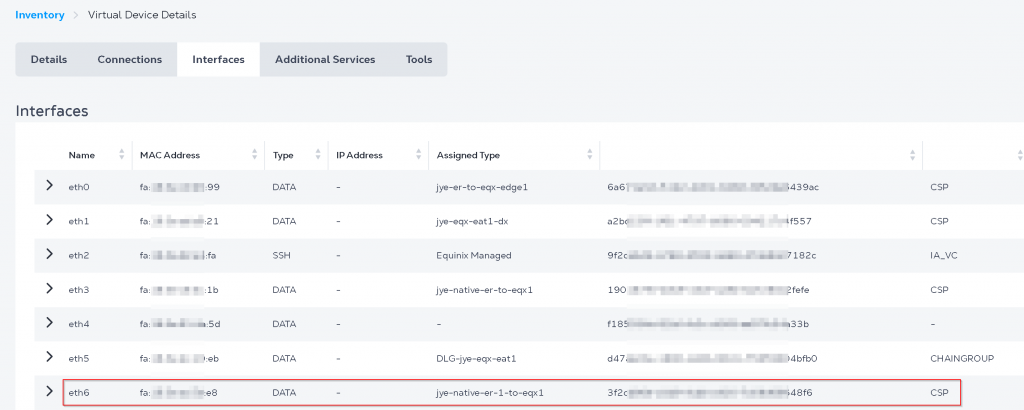
You can also find EAT interface MAC address in Equinix portal -> Network Edge -> Virtual Device Inventory -> Select your EAT device -> Interfaces
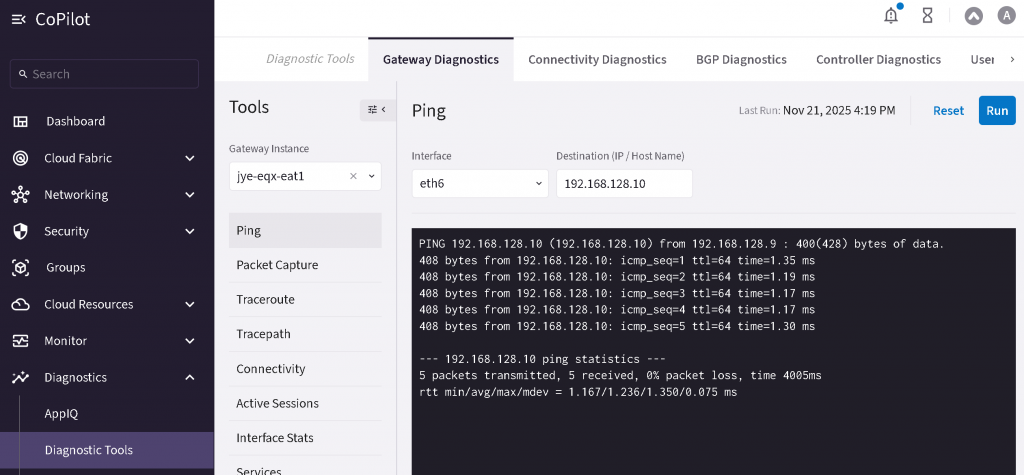
Now you should be able to perform ping from EAT to the MSEE to confirm L2 Connectivity CoPilot -> Diagnostics -> Diagnostic tools -> Select EAT instance -> Select interface -> ping MSEE IP
Establish BGP over LAN connection between MSEE and Aviatrix EAT
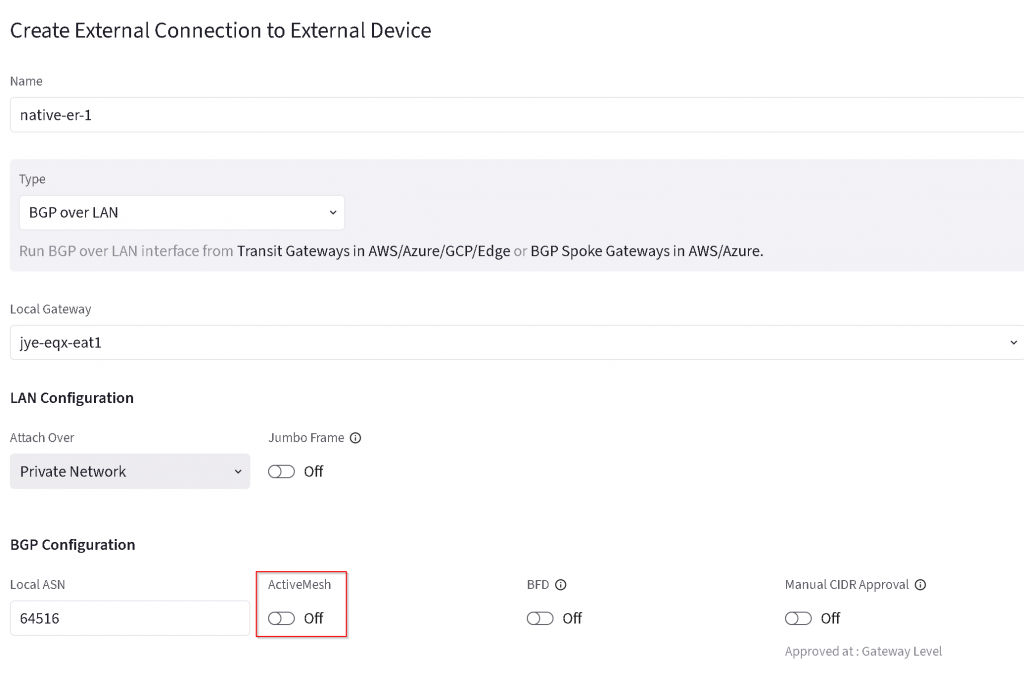
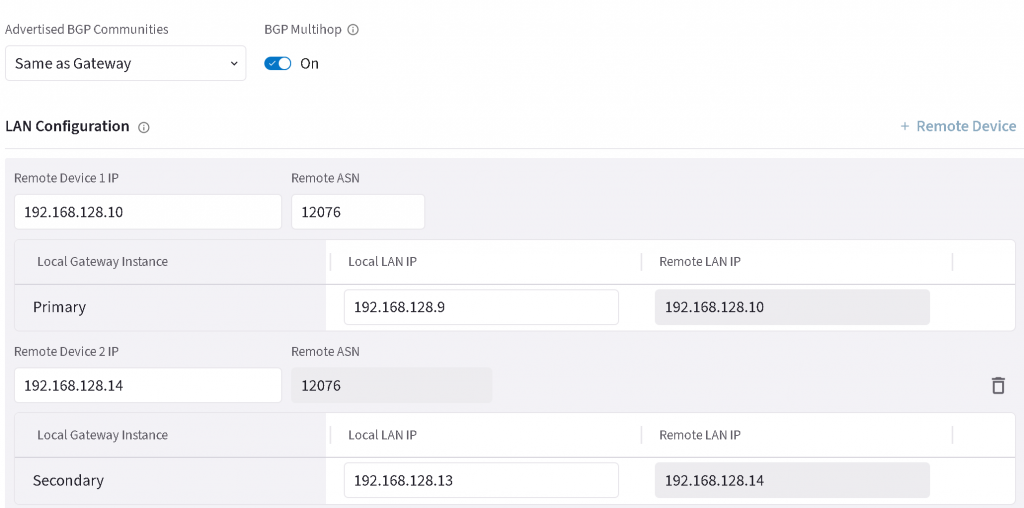
Name the connection, select BGP over LAN, select primary EAT, uncheck ActiveMesh,
Add additional Remote device, enter Remote device IP and Local LAN IP for both primary and HA EAT, enter 12076 as MSEE ASN, then save the configuration.
If everything goes well, then the two BGP connections will come up
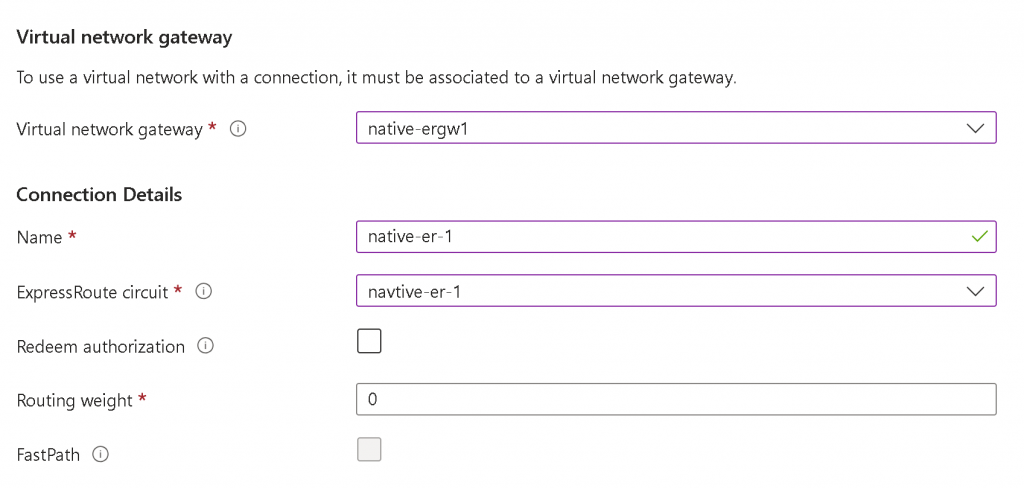
Connect the Express Route Circuit with Express Route gateway for your Azure vNet hub or vWAN.
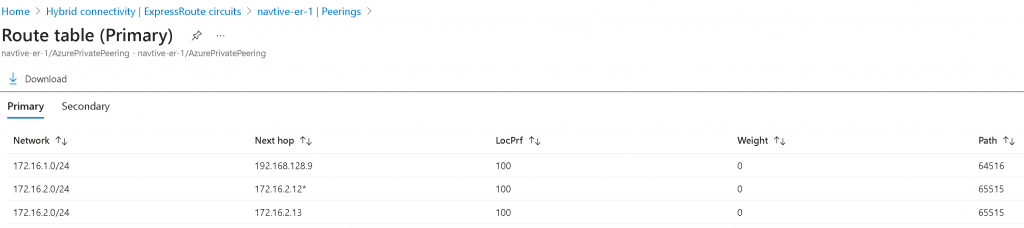
After the connection is created, you can click on ER Circuit -> Peerings -> Select Azure Private -> View route table
It will show the local route (AS 65515) and remote route received from EAT
HINT
If you are terminating two ER circuits on the same EAT device. Both ER MSEE will have AS 12076, so the prefix learned from one ER circuit will be dropped by the other ER circuit due to the same ASN number. You will have to use EAT Manual BGP Advertisement towards both ER BGP over LAN connections to replace 12076 with EAT’s ASN.
During Network Migration, sometimes we need to compare two prefix lists quickly to find out the difference, I’ve created some quick tools for this purpose. The tool uses JavaScript that will run locally in your browser, so no data will be sent to me.
Compare prefix lists
Enter prefix lists to be compared. Prefix list can be either comma-seperated or newline-seperated
Base policy of a tag can either be Allow or Deny, it cannot be both
When base policy is allow:
tag entries using base policy will be allowed
tag entries using explicit allow will be allowed,
tag entries using explicit deny will be dropped
Any other FQDN not in the tag entries will be dropped.
When base policy is deny:
tag entries using base policy will be dropped.
tag entries using explicit deny would be dropped
tag entries using explicit allow will be allowed.
Any other FQDN not in the tag entries will be allowed.
When multiple tags are associated with the same FQDN gateway, they must all have same type of Base policy
either all tags base policy use Allow
or all tags base policy use Deny
Only HTTP/HTTPs traffic support wildcard FQDN (eg: *.domain.com). None HTTP/HTTPs traffic requires specific FQDN (eg: custom.protocol.domain.com)
When there are multiple tags associated with same FQDN gateways, for example:
Tag 1 edit source option not been used
Tag 2 edit source option not been used
Tag 3 edit source option used and linked to source CIDR: 10.16.64.0/24
When 10.16.64.4 initiate egress traffic, Tag 3 will be applied first, as it matches more specific source CIDR range 10.16.64.0/24. Then less specific tags, such as Tag 1 and Tag 2 (not necessary the order listed in GUI) will be applied.
Aviatrix controller will program the order of Tag1 and Tag2, you will have to engage Aviatrix Support to find out the exact sequence programmed on FQDN gateway.
If a match of deny rule was applied, no further tags will be processed.
az vm image terms accept --urn publisher:offer:sku:version
To accept Aviatrix Controller Marketplace offer:
az vm image terms accept --urn aviatrix-systems:aviatrix-bundle-payg:aviatrix-enterprise-bundle-byol:latest
To accept Aviatrix CoPilot Marketplace offer:
az vm image terms accept --urn aviatrix-systems:aviatrix-copilot:avx-cplt-byol-01:latest
To validate, replace ‘accept’ with ‘show’ and rerun the command, it should say:
"accepted": true,
To cancel the offer:
az vm image terms cancel --urn aviatrix-systems:aviatrix-bundle-payg:aviatrix-enterprise-bundle-byol:latest

az vm image terms cancel --urn aviatrix-systems:aviatrix-copilot:avx-cplt-byol-01:latest
Aviatrix customer has applications running in various VPCs, these applications need to be able to communicate with FiServ securely via BGP over IPSec tunnels. FiServ also has lots of its own customers that most likely use RFC1918 as internal address space. To avoid conflicts, FiServ assigns non-RFC1918 IP Prefixes to FiServ customers, the incoming connection must be Source NAT (SNAT) to these non-RFC1918 IP Prefixes, and FiServ also only allows incoming traffic from these non-RFC1918 IP Prefixes on FiServ firewalls.
As of writing, on Aviatrix Controller version 7.1.2131 and CoPilot v4.3.1, the current process of installing a certificate:
For Aviatrix Controller
By default, the Aviatrix Controller uses a self-signed certificate. In this case, an option to generate a Certificate Signing Request (CSR) will be available. The CSR requires the Fully Qualified Domain Name (FQDN) of the controller, e.g., avx-controller.mycompany.com. When the CSR is generated, the controller will also generate and store a corresponding private key. The generated CSR is supplied to the Certificate Authority (CA) which will return a signed public certificate. In addition to this certificate, a CA certificate (generally publicly available from the CA) will also be required during the import process.
If a public certificate is already installed, you can no longer generate a CSR without first reverting to a self-signed certificate.
There is also an option to import an externally generated private key with corresponding public and CA certs.
For Aviatrix CoPilot
The Copilot does not support the generation of CSR’s. Instead, an externally generated private key and corresponding CA-signed public key are required for importation.
The processes above can be challenging for customers, especially when renewing existing certificates. This confusion is compounded by the variety of different certificate types of Certification Authorities, certificate formats and operating system tools.
This blog intends to create a more standardized process for Aviatrix Customers to follow.