
In my last blog post, I have covered one option to connect On-Premise data center to Aviatrix Transit via Direct Connect, it’s easy to implement however with following draw backs:
- Each IPSec tunnel between Aviatrix Transit and AWS Virtual Private Gateway (VGW) is limited to 1.25Gbps of throughput, and we can only have 4 tunnels which limits the aggregated throughput to 5Gbps. For customer want to have higher throughput, this won’t be viable.
- Private Virtual Interface support up to 100 BGP routes, BGP session will go DOWN when more routes been advertised
- Between On-Premise to VGW, traffic maybe protected by MACSec, but still expose to man in the middle attack. Reference article: Securing your network connection to the cloud: MACSec vs. IPSec
How do we overcome these constrains? Let me take you through the second option connecting to Aviatrix Transit via Direct connect.
This architecture have following requirements and constrains highlighted
- VGW need to be create in the same region as Aviatrix Transit VPC
- VGW need to be attached to Aviatrix Transit VPC
- VGW will propagate BGP route received from On-Premise to your designated route table in attached VPC, with this, the Aviatrix Transit Gateway will be able to communicate with on-premise router/firewall to establish underlay connectivity.
- Direct Connect Gateway (DXGW) is optional, but recommended:
- DXGW is a global construct and will allow you to attach multiple VGW from same or different regions, which gives you further flexibility
- With DXGW, you can control the prefixes advertised back to on-premise for each VGW attached.
- When DXGW is been used, on-premise router will establish BGP peer with DXGW ASN
- When DXGW is NOT been used, on-premise router will establish BGP peer with VGW ASN
- Above steps allowed Aviatrix Transit Gateway to communicate with on-premise router/firewall, this connectivity can be used as underlay. From the same router/firewall, if it’s capable of using GRE or IPSec tunneling protocol, we can establish another BGP connection between on-premise router/firewall to Aviatrix Transit Gateway, this connection is consider as overlay.
- The overlay connection uses BGP peering between Aviatrix Transit Gateway and on-premise devices, thus overcome the 100 Route limitation on Private VIF
- The overlay connection can use GRE, which has less overhead than IPSec and potentially get to 5Gbps per tunnel throughput.
- Traffic running on Private VIF maybe protected by MACSec, but still expose to man in the middle attack. Reference article: Securing your network connection to the cloud: MACSec vs. IPSec
- GRE Protocol only provides encapsulation but not able to provide encryption
- GRE Protocol can only be used in AWS, and cannot be used in Azure or GCP or OCI
Steps to create the connection
Build underlay connectivity
- In AWS Console, search and open Direct Connect service
- Get the Direct Connect -> Connection provisioned and accepted in your AWS account, the status of the Connection should show up as available

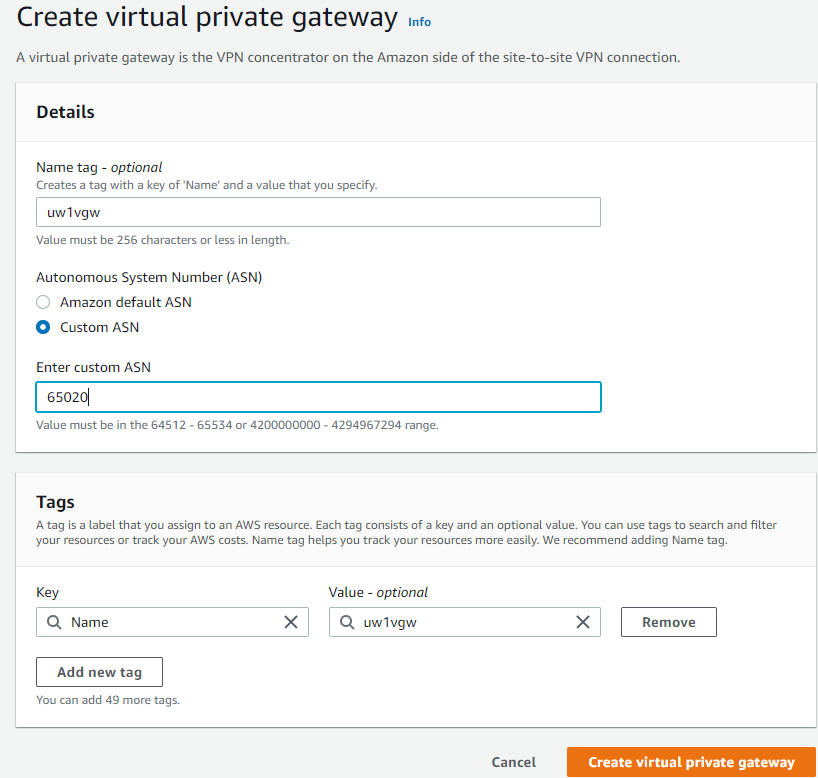
- Direct Connect -> Virtual private gateways -> Create virtual private gateway

- Switch to the same region as your Aviatrix Transit Gateway, provide:
- Name
- ASN of the VGW that you are creating
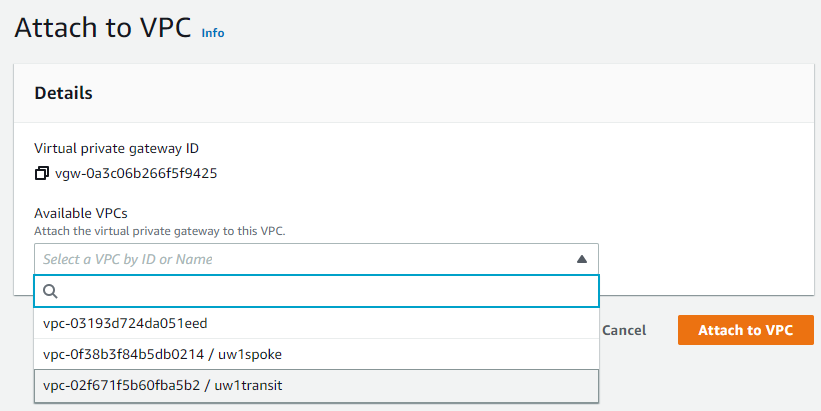
- VGW has been created, note it shows Detached
- Actions -> Attach to VPC, and select Aviatrix Transit VPC


- Find Aviatrix Transit Gateway EC2 instance, click on the subnet that’s connected to eth0
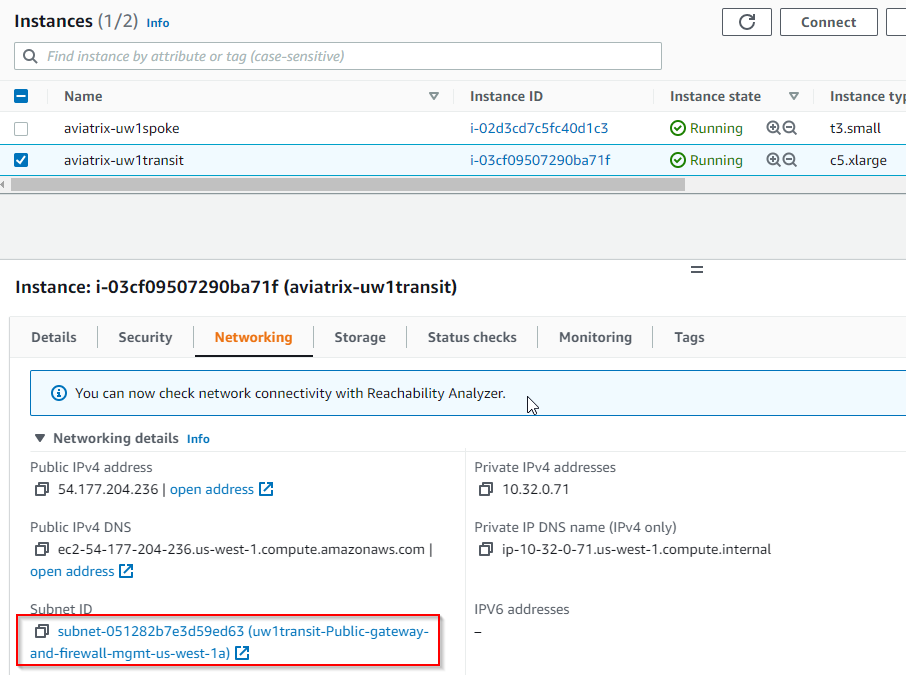
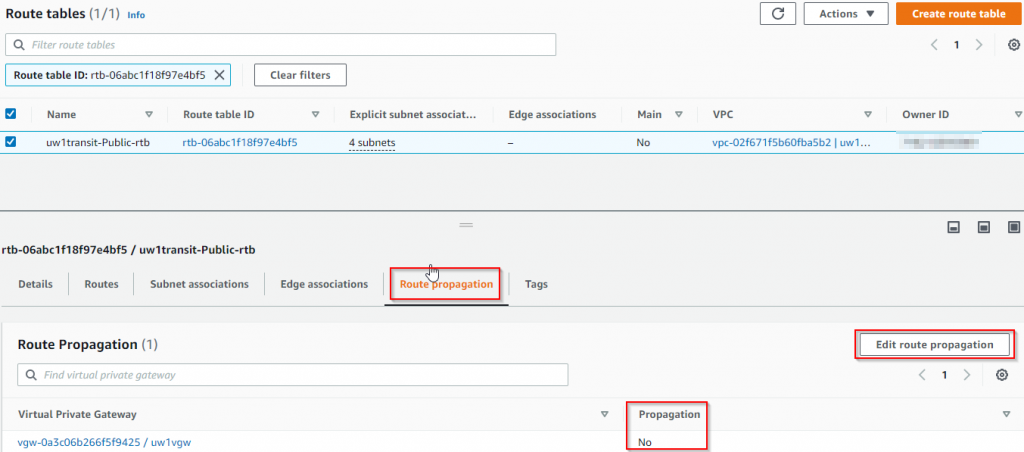
- Find the route table that’s associated with the subnet, then click on it.
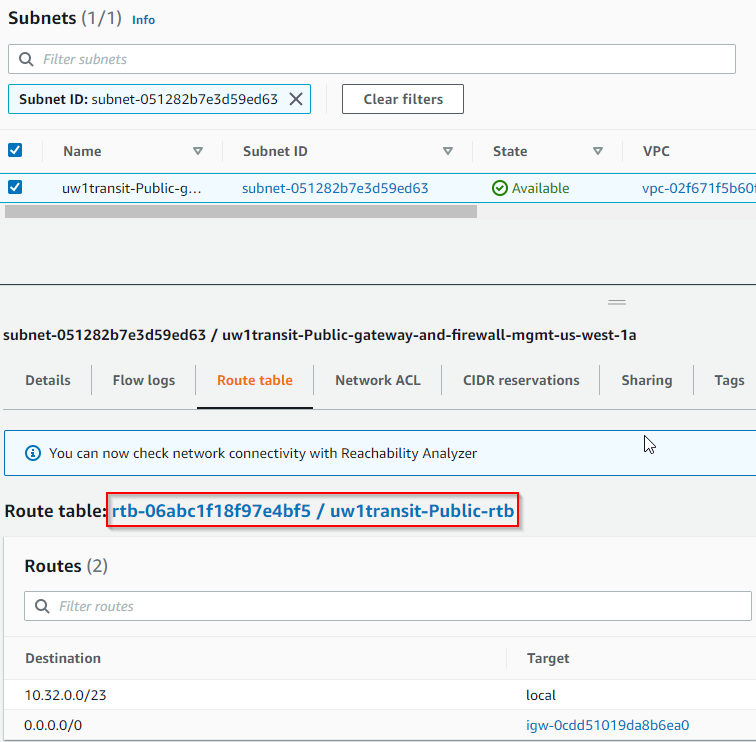
- Once navigated to the route table, click on Route propagation tab, and notice that Propagation is currently set to No, click on Edit route propagation button
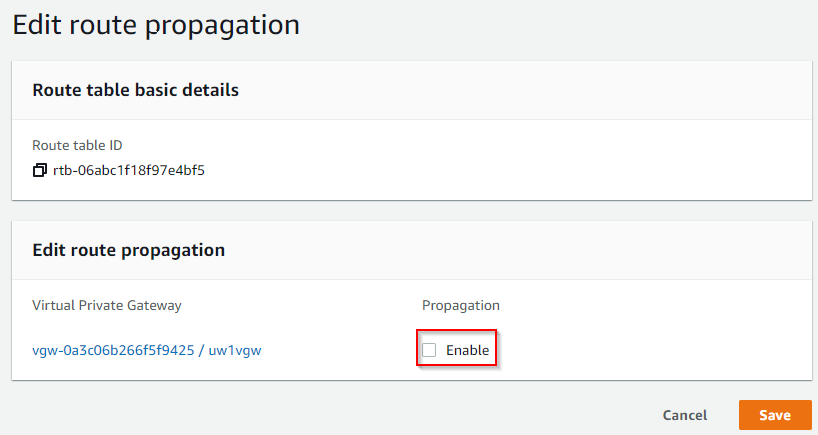
- Enable Propagation, then click on Save
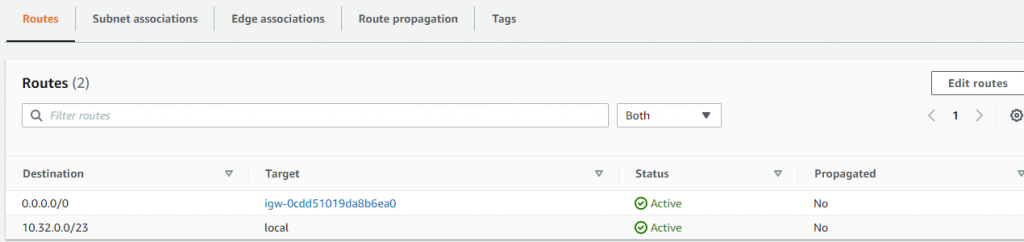
- Note how only local route and 0/0 point to IGW at this point
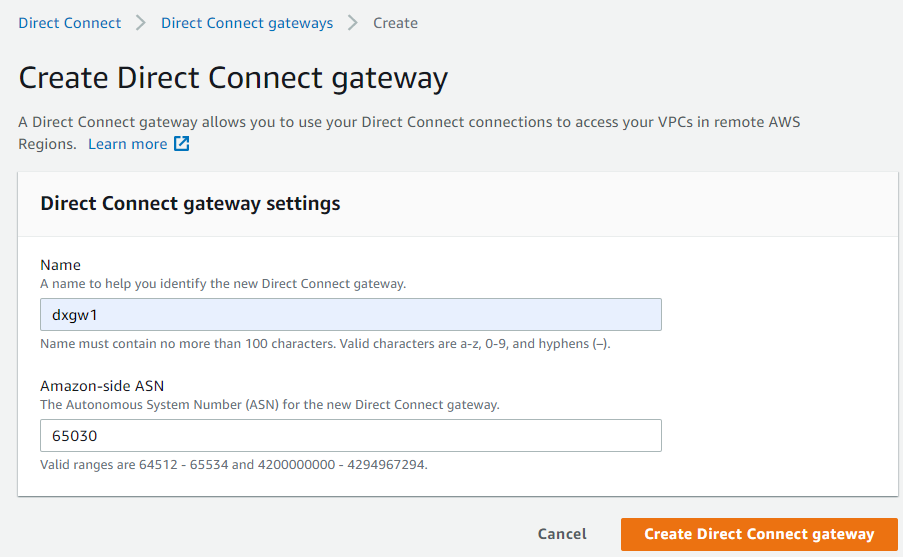
- Switch to Direct Connect service page, then click on Direct Connect Gateways, click on Create Direct Connect Gateway

- Give your DXGW a name, and enter the ASN number of DXGW, note how it’s a global construct
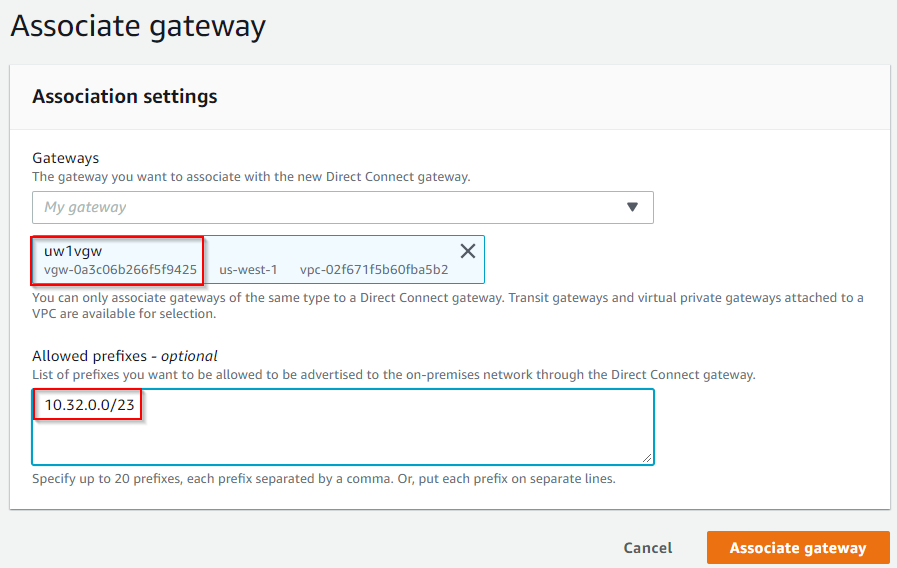
- It’s easy to overlook to connect DXGW with VGW, once DXGW gets created, click on it, and click on Gateway associations tab -> Associate gateway
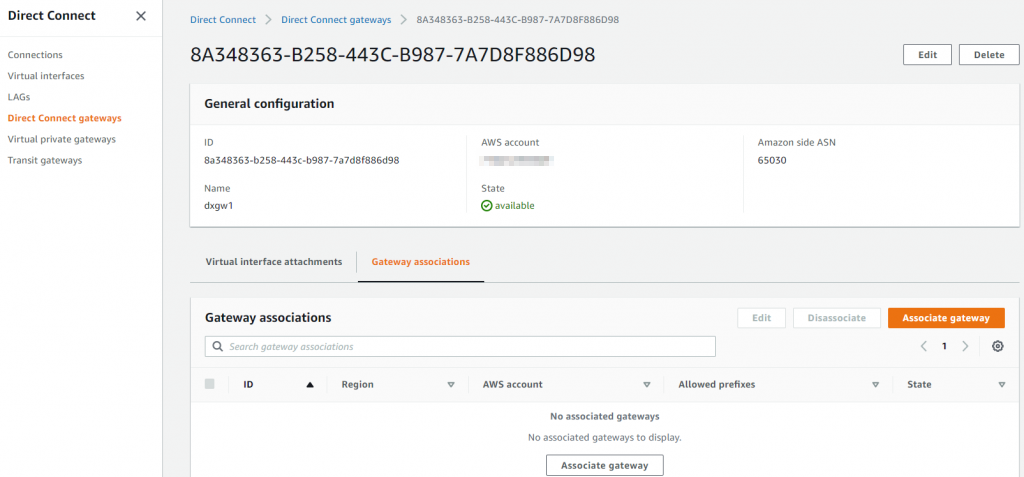
- Select the VGW create earlier to associate with DXGW, note it have an option to set up to 20 prefixes to be advertised to on-premise.
- Note1 this is static entry, entries in this list will be advertised to on-premise regardless the status of Aviatrix Transit. In our case, we are using this connection as underlay, so we should put in *only* Aviatrix Transit VPC’s CIDR range here.
- Note2 although this prefixes list can be updated in the future, it does take couple of minutes to be update
- It will take a while before the state change from associating to associated

- Direct Connect -> Connection, note down the Connection’s VLAN number
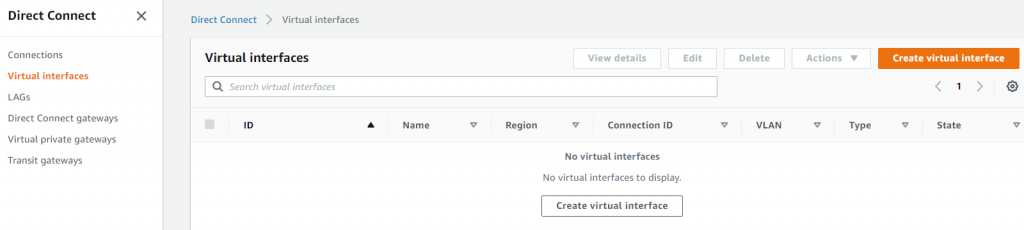
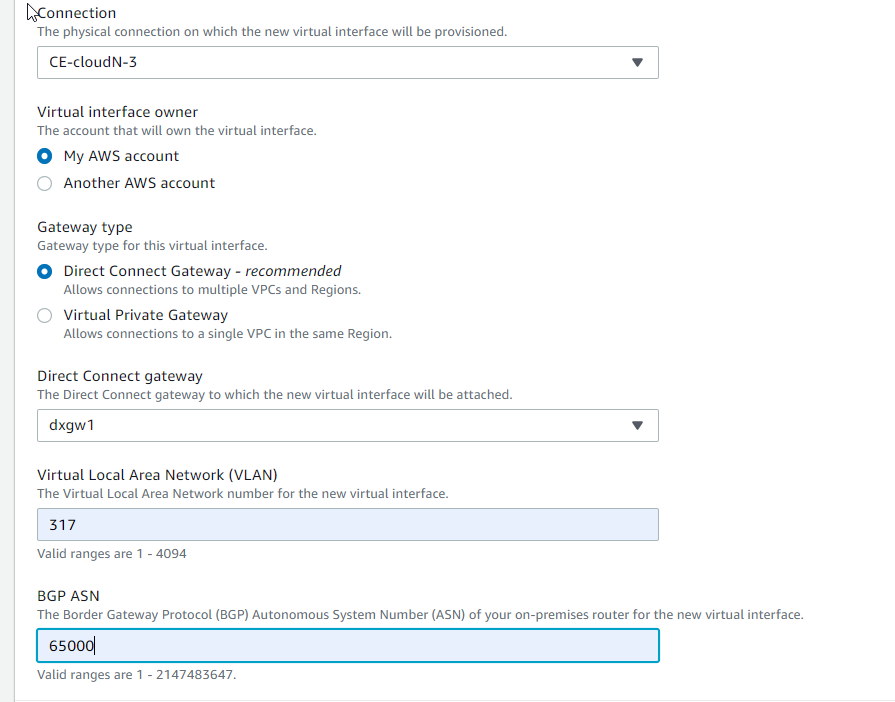
- Direct Connect -> Virtual interfaces -> Create the Private Virtual Interface
- Choose Private VIF and give it a name
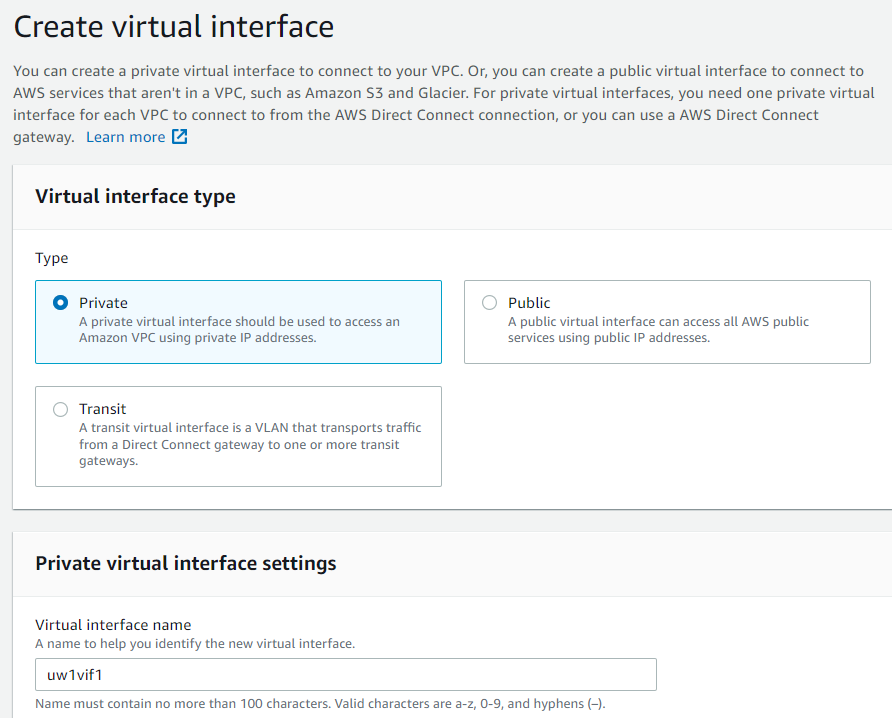
- Scroll down, pick the DX connection, select DXGW that we created earlier. If no DXGW was created, then select VGW here. Provide the VLAN number noted from the DX Connection earlier. Provide On-Premise router/firewall’s ASN number, then click Create Virtual Interface button in the bottom.
- If you switch over to Direct Connect -> Direct Connect gateways section, and check Virtual interface associations, you can see the status change from associating to associating to associated.

- The private VIF is now created, but the status should be down

- Click on the private VIF, note down the two 169.254.x.x peer IPs and BGP authentication key.

- Switch over to on-premise router/firewall, first configure the connected interface to use Your router peer IP in above screenshot
interface GigabitEthernet0/0/0.703
 description connected to VIF
 encapsulation dot1Q 703
ip address 169.254.96.6 255.255.255.248- Test to make sure there’s L2 connectivity
#ping 169.254.96.1 source 169.254.96.6

Type escape sequence to abort.
Sending 5, 100-byte ICMP Echos to 169.254.96.1, timeout is 2 seconds:
Packet sent with a source address of 169.254.96.6
!!!!!
Success rate is 100 percent (5/5), round-trip min/avg/max = 1/1/2 ms- Config BGP peering with Amazon side. Note On Premise is using ASN 65000 and DXGW ASN is 65030.
router bgp 65000
 neighbor 169.254.96.1 remote-as 65030
 neighbor 169.254.96.1 password <BGP_Password>
 address-family ipv4
  neighbor 169.254.96.1 activate
neighbor 169.254.96.1 soft-reconfiguration inbound- Check BGP summary, and it should be up right now
#show ip bgp summary
BGP router identifier 192.168.77.1, local AS number 65000
BGP table version is 30, main routing table version 30
5 network entries using 1240 bytes of memory
5 path entries using 680 bytes of memory
2/2 BGP path/bestpath attribute entries using 560 bytes of memory
1 BGP AS-PATH entries using 24 bytes of memory
0 BGP route-map cache entries using 0 bytes of memory
0 BGP filter-list cache entries using 0 bytes of memory
BGP using 2504 total bytes of memory
BGP activity 17/12 prefixes, 17/12 paths, scan interval 60 secs

Neighbor        V           AS MsgRcvd MsgSent   TblVer  InQ OutQ Up/Down  State/PfxRcd
169.254.96.1    4        65030       8      10       30    0    0 00:02:33        1
- We can also check route received via AWS peer, we can notice that it learned the Aviatrix Transit VPC CIDR, remember we set this on DXGW to VGW association allowed prefixes list.
#show ip bgp neighbors 169.254.96.1 received-routes

BGP table version is 31, local router ID is 192.168.77.1
Status codes: s suppressed, d damped, h history, * valid, > best, i - internal,
              r RIB-failure, S Stale, m multipath, b backup-path, f RT-Filter,
              x best-external, a additional-path, c RIB-compressed,
              t secondary path, L long-lived-stale,
Origin codes: i - IGP, e - EGP, ? - incomplete
RPKI validation codes: V valid, I invalid, N Not found

     Network          Next Hop            Metric LocPrf Weight Path
 *>   10.32.0.0/23     169.254.96.1                           0 65030 i

Total number of prefixes 1
- AWS side should show the VIF status is available, if you click on the VIF, you can see BGP status is Up


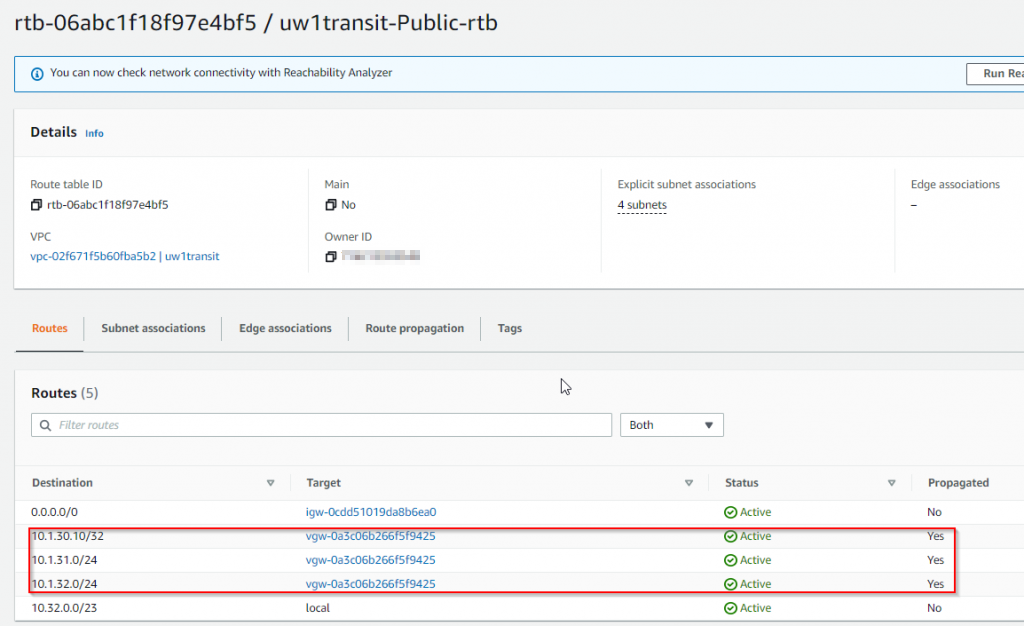
- Check the route table on Aviatrix Transit Gateway eth0 interface attached subnet, you may notice that several prefixes been propagated from on-premise device already, where the next hop set to VGW, and Propagated shows as Yes.
- We don’t need all these prefixes exposed to Aviatrix Transit, so we will create a loopback adapter, also create prefix-list to control only the loopback address is propagated to Aviatrix Transit VPC route table
- Create a lookback adapter
interface Loopback77
 ip address 192.168.77.1 255.255.255.255
 router bgp 65000
  address-family ipv4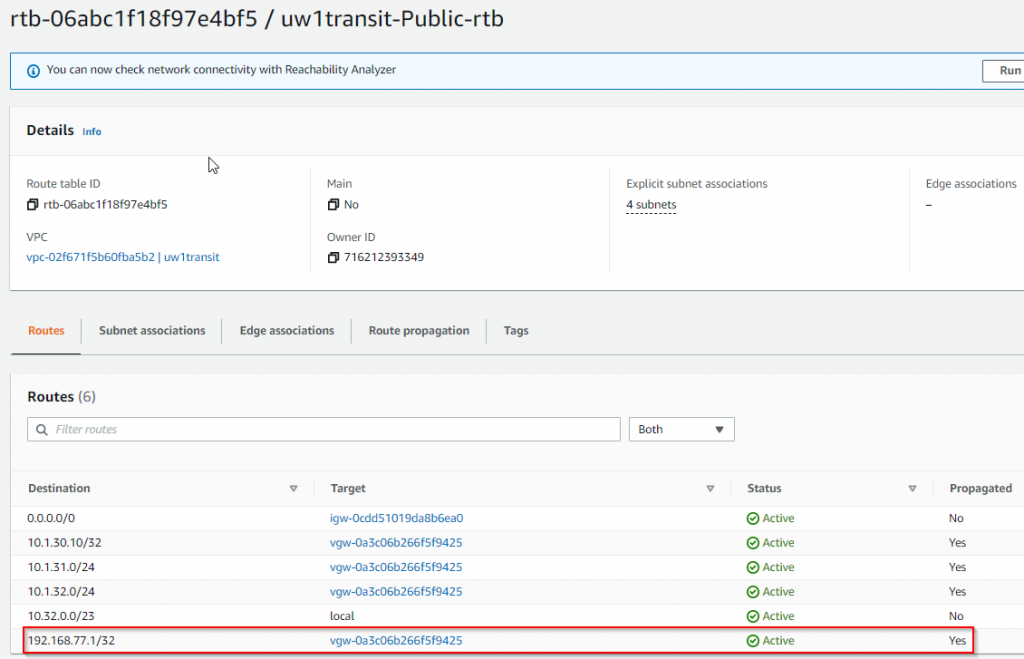
network 192.168.77.1 mask 255.255.255.255- Note the loopback 192.168.77.1/32 is now propagated to Aviatrix Transit VPC route table
- Create prefix-list to limit the prefixes to just 192.168.77.1/32
ip prefix-list Router-to-DXGW description Advertise Loopback to be underlay
ip prefix-list Router-to-DXGW seq 10 permit 192.168.77.1/32
router bgp 65000
 address-family ipv4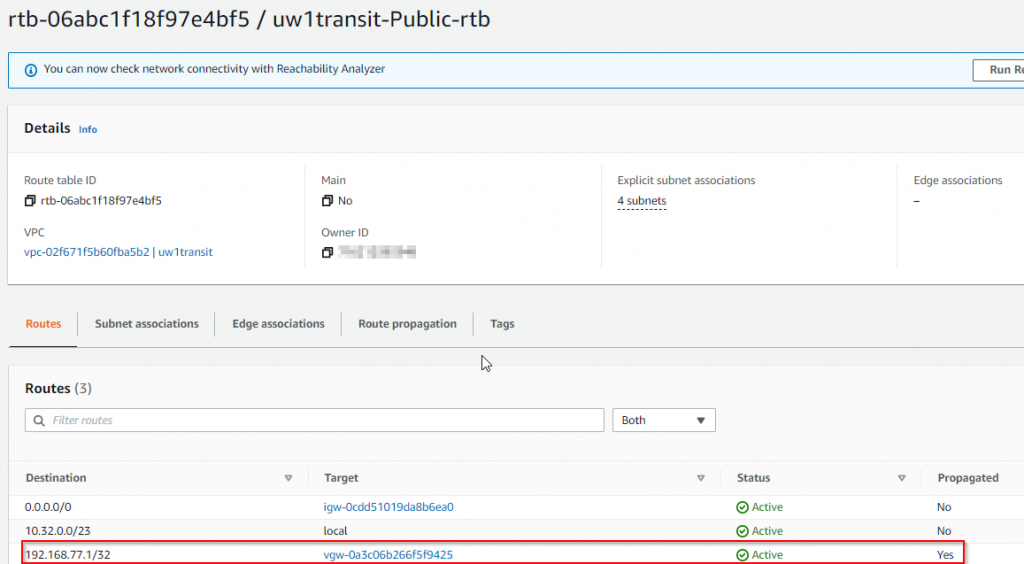
neighbor 169.254.96.1 prefix-list Router-to-DXGW out- Check Aviatrix Transit VPC route table again, now only the loopback adapter is propagated
- Get Aviatrix Transit Gateway’s private IP
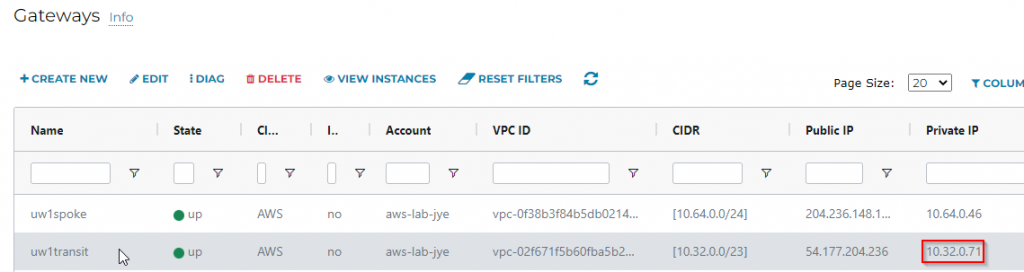
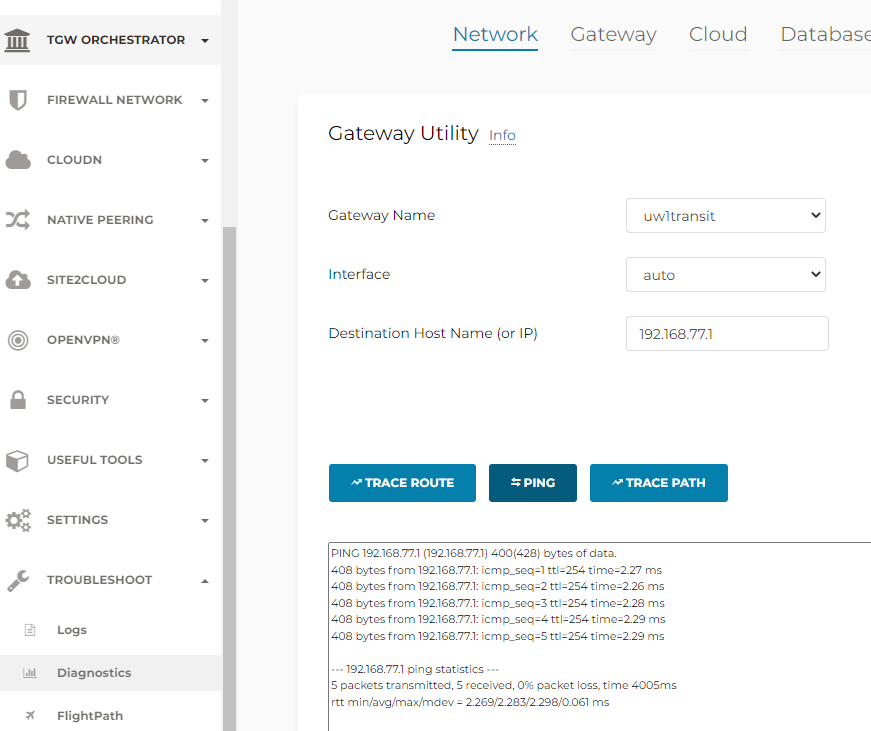
- Confirm connectivity from Aviatrix Transit Gateway to On-Premise (Reverse won’t work as there are Security Group on Aviatrix Transit Gateway blocking incoming connections)
Build overlay connectivity
We have spent great deal of time to get underlay working. Now how difficult is it to build the GRE overlay towards Aviatrix Transit? Let’s find out.
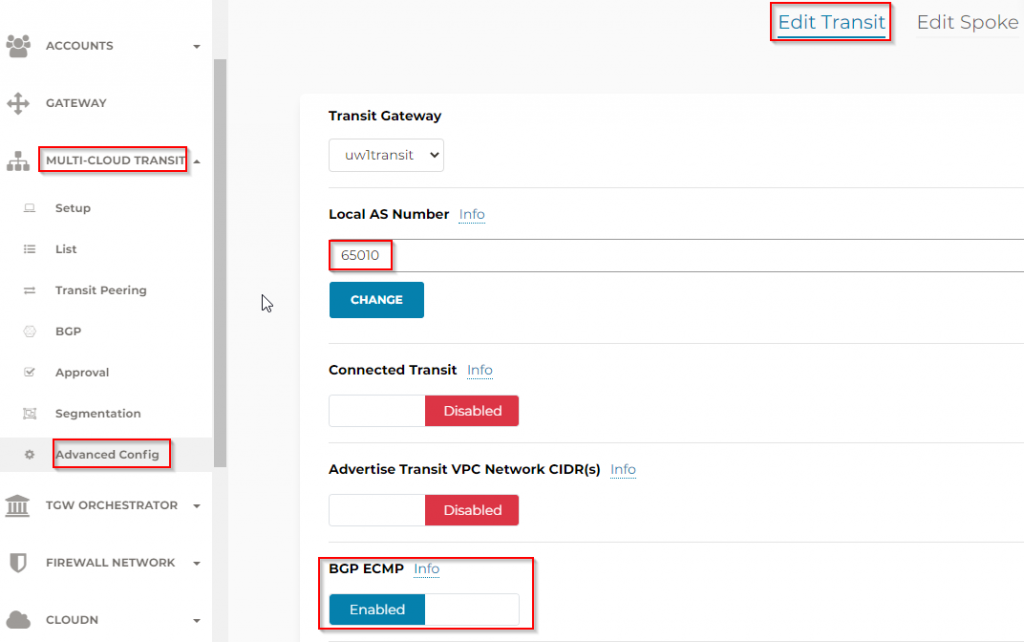
- Make sure Aviatrix Transit Gateway have ASN assigned, and if we are building multiple active/active tunnels, enable BGP ECMP
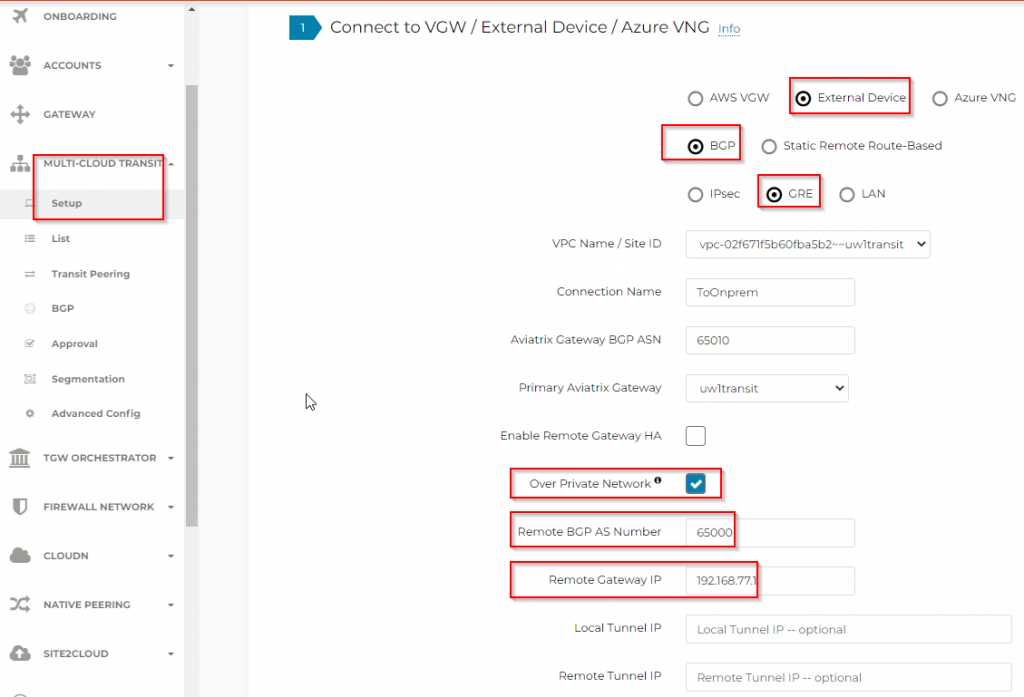
- Multi-cloud transit -> Setup -> External connections
- External device
- BGP
- GRE
- Select Transit Gateway, previously set ASN should be prepopulated
- Specify remote BGP AS number from on-premise
- Use the loopback IP as remote gateway IP
- Click on Connect button at bottom
- Site2Cloud -> Setup -> Select the S2C (Site2Cloud) connection we created earlier, then click on Edit button

- Aviatrix support generate configuration for Cisco ISR, ASR, CSR, ASA or generic vendor neutral format, since I’m using ISR and I will choose to export the configuration
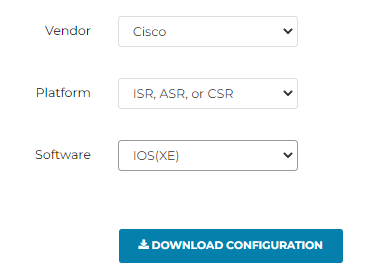
- This is the example of the config, since I only have one Transit Gateway, so it only generates one tunnel.
! Aviatrix GRE configuration template
!
! This configuration serves as a general guideline and may have to be modified to
! be functional on your device.
!
! <tunnel_number1>: the GRE tunnel interface number
! <ios_wan_interface1>: the source interface of tunnel packets
! <customer_tunnel_ip1>: any un-used IPv4 address for the tunnel interface
!                        when static routing is used (e.g. 1.1.1.1)
! <netmask>: netmask for customer_tunnel_ip. Please use 255.255.255.255
!
!---------------------------------------------------------------------------------------
! #1: Tunnel Interface Configuration
! The virtual tunnel interface is used to communicate with the remote GRE endpoint
! to establish the GRE tunnel.
!
interface Tunnel <tunnel_number1>
  ip address 169.254.214.237 255.255.255.252
  ip mtu 1436
  ip tcp adjust-mss 1387
  tunnel source <ios_wan_interface1>
  tunnel destination 10.32.0.71
  ip virtual-reassembly
  no keepalive
  exit
!
!---------------------------------------------------------------------------------------
! #2: BGP Routing Configuration
! The Border Gateway Protocol (BGPv4) is used to exchange routes from the VPC to on-prem
! network. Each BGP router has an Autonomous System Number (ASN).
!
router bgp 65000
  bgp log-neighbor-changes
  neighbor 169.254.214.238 remote-as 65010
  neighbor 169.254.214.238 timers 60 180
  ! bgp md5 authentication password need to be added if configured
  ! neighbor 169.254.214.238 password
  !
  address-family ipv4
    redistribute connected
    neighbor 169.254.214.238 activate
    neighbor 169.254.214.238 soft-reconfiguration inbound
    maximum-paths 4
  exit-address-family
!
!---------------------------------------------------------------------------------------
!
!
For vendor specific instructions, please go to the following URL:
http://docs.aviatrix.com/#site2cloud
- This is the actual code that I will need
- Substitute tunnel_number1 -> 11
- Substitute ios_wan_interface1 -> 192.168.77.1, the loopback we created earlier
interface Tunnel 11
  ip address 169.254.214.237 255.255.255.252
  ip mtu 1436
  ip tcp adjust-mss 1387
  tunnel source 192.168.77.1
  tunnel destination 10.32.0.71
  ip virtual-reassembly
  no keepalive
  exit
router bgp 65000
  bgp log-neighbor-changes
  neighbor 169.254.214.238 remote-as 65010
  neighbor 169.254.214.238 timers 60 180
  address-family ipv4
    redistribute connected
    neighbor 169.254.214.238 activate
    neighbor 169.254.214.238 soft-reconfiguration inbound
    maximum-paths 4
exit-address-family- The S2C connection should be Up now, use diagnostic if run into trouble

- Beside of the underlay BGP, the overlay BGP is also up
#show ip bgp summary
BGP router identifier 192.168.77.1, local AS number 65000
BGP table version is 37, main routing table version 37
8 network entries using 1984 bytes of memory
8 path entries using 1088 bytes of memory
4/4 BGP path/bestpath attribute entries using 1120 bytes of memory
2 BGP AS-PATH entries using 48 bytes of memory
0 BGP route-map cache entries using 0 bytes of memory
0 BGP filter-list cache entries using 0 bytes of memory
BGP using 4240 total bytes of memory
BGP activity 21/13 prefixes, 21/13 paths, scan interval 60 secs

Neighbor        V           AS MsgRcvd MsgSent   TblVer  InQ OutQ Up/Down  State/PfxRcd
169.254.96.1    4        65030     160     175       37    0    0 01:16:50        1
169.254.214.238 4 65010 6 9 37 0 0 00:02:37 1- Through overlay, it received Aviatrix Spoke 10.64.0.0/24 CIDR
#show ip bgp neighbors 169.254.214.238 received-routes
BGP table version is 37, local router ID is 192.168.77.1
Status codes: s suppressed, d damped, h history, * valid, > best, i - internal,
r RIB-failure, S Stale, m multipath, b backup-path, f RT-Filter,
x best-external, a additional-path, c RIB-compressed,
t secondary path, L long-lived-stale,
Origin codes: i - IGP, e - EGP, ? - incomplete
RPKI validation codes: V valid, I invalid, N Not found
Network Next Hop Metric LocPrf Weight Path
*> 10.64.0.0/24 169.254.214.238 0 0 65010 i
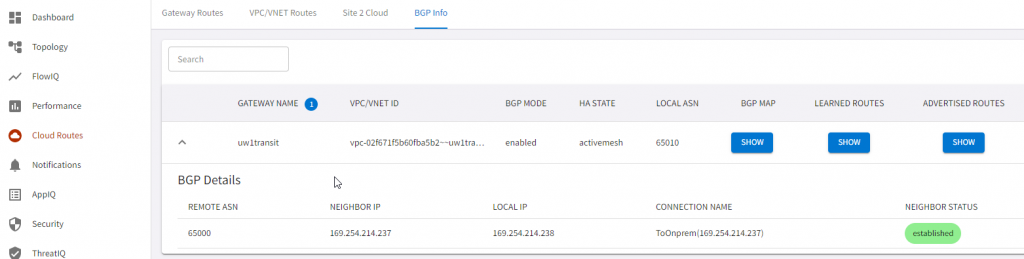
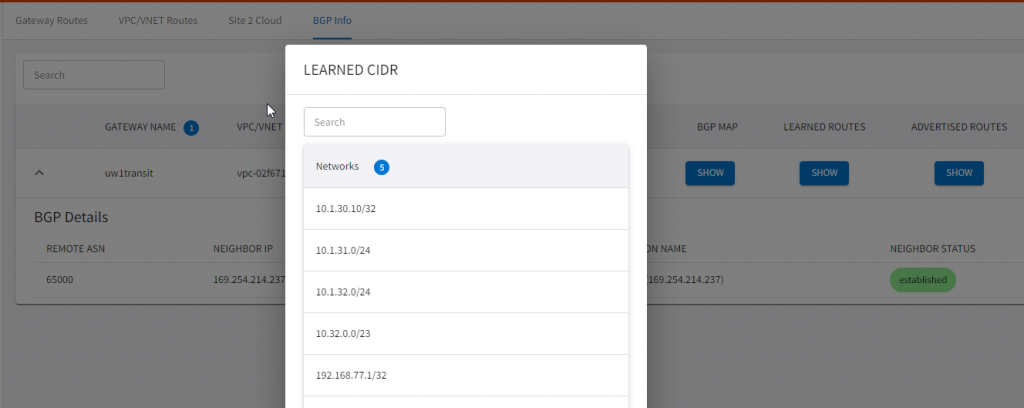
Total number of prefixes 1 - We can validate this also from Aviatrix CoPilot

After thoughts
This is great! You can see it’s very easy to use Aviatrix to build the overlay, and get a glimpse of how easy to get the diagnostic information. However, how do we tackle the following constrains? In part three, I will show you how we can have the best of both worlds.
- Traffic running on Private VIF maybe protected by MACSec, but still expose to man in the middle attack. Reference article: Securing your network connection to the cloud: MACSec vs. IPSec
- GRE Protocol only provides encapsulation but not able to provide encryption
- GRE Protocol can only be used in AWS, and cannot be used in Azure or GCP or OCI