
When working with Aviatrix External Connections, it could be confusing to understand how tunnels are established. I will take you through three scenarios and hopefully help to planning to Aviatrix External connections with other vendors.
This article focuses on building External connections from this menu path:
Controller -> Multi-Cloud Transit -> Setup -> External Connections or
CoPilot GUI → Networking → Connectivity → External Connections (S2C) → + External Connection → External Device → Type:
- BGP over IPSec
- BGP over GRE
- BGP over LAN
- Static Routing over IPSec → Static Routing Type: Active Mesh
You can only select BGP-capable Aviatrix Gateways from this path, such as Aviatrix Transit Gateway, Aviatrix BGP Spoke Gateway or Aviatrix Edge Gateway. Also the IPSec tunnel can only be route based.
The other path: Controller -> Site2Cloud -> Setup -> Add New or
CoPilot -> Networking -> Connectivity -> External Connections (S2C) -> + External Connection -> External Device -> Type : Static Routing over IPSec -> Static Routing Type: Unmapped NAT or Mapped NAT can only build static mapped/unmapped connections. This path is out of the scope of this blog.
To start with. I’ve deployed two Aviatrix Transits using following code:
module "mc-transit-1" {
  source  = "terraform-aviatrix-modules/mc-transit/aviatrix"
  version = "2.2.1"
  cloud = "aws"
  region = "us-east-1"
  cidr = "10.100.0.0/23"
  account = "aws-lab-jye"
  name = "transit1"
  local_as_number = 65001
}

module "mc-transit-2" {
  source  = "terraform-aviatrix-modules/mc-transit/aviatrix"
  version = "2.2.1"
  cloud = "aws"
  region = "us-east-1"
  cidr = "10.200.0.0/23"
  account = "aws-lab-jye"
  name = "transit2"
  local_as_number = 65002
}
This code created four transit gateways, a pair for each transit with following public IPs
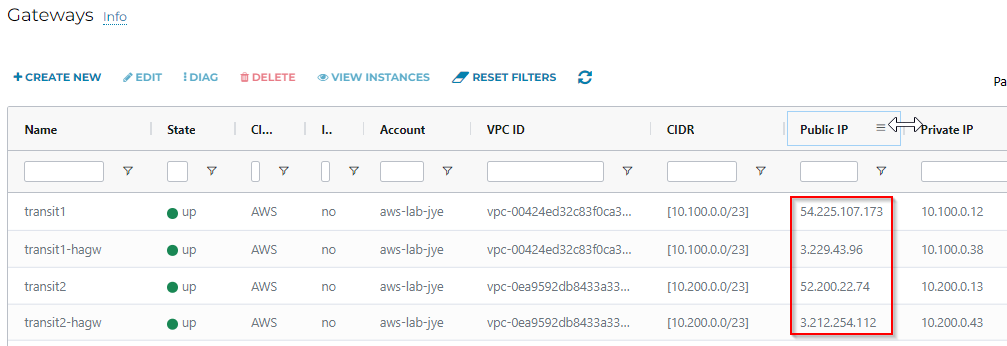
| Transit Name | Public IP |
| transit1 | 54.225.107.173 |
| transit1-hagw | 3.229.43.96 |
| transit2 | 52.200.22.74 |
| transit2-hagw | 3.212.254.112 |
Scenario one

One Remote Gateway, no Remote Gateway HA
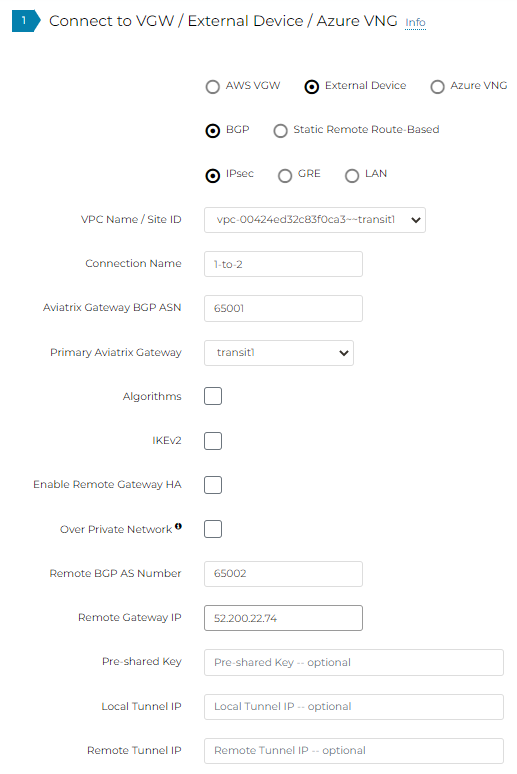
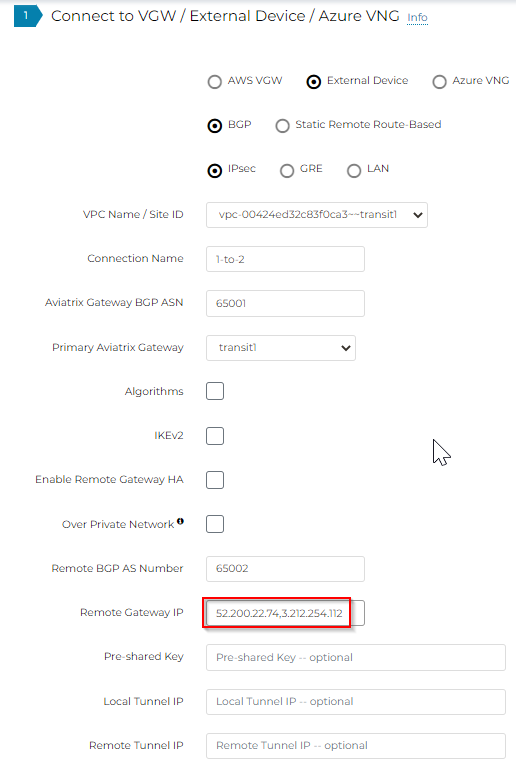
We selected Transit1, which have two gateways: transit1 and transt1-hagw
We entered one target IP as Remote Gateway IP
After the connection is created, you can observe the tunnels via Multi-Cloud Transit -> List -> Transit Gateway -> Select Transit1 -> Details/Diag -> Connections – <connection name>
Note how two tunnels will be created from each Transit Gateway towards the single Remote Gateway IP

We can also observe this more clearly from CoPilot -> Cloud Routes -> Site 2 Cloud. We can clearly see the source coming from both transit gateways and target to a single IP. Will use CoPilot screenshot going forward.
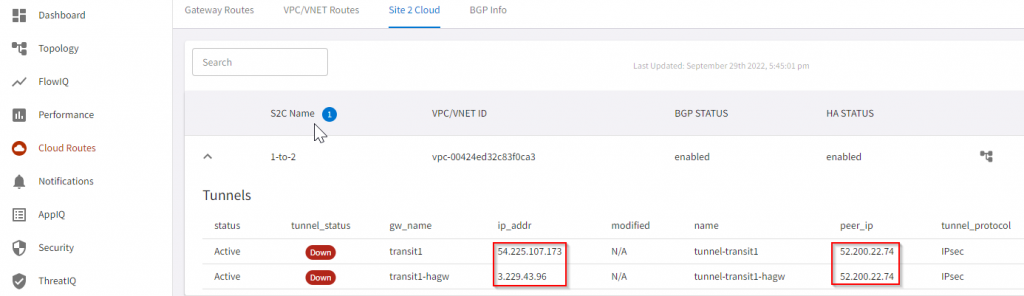
Note: There will be a bit delay before CoPilot can reflect the change.
Equivalent workflow in CoPilot → Networking → Connectivity → External Connections (S2C) → + External Connection
Specify only a single Remote Device 1 Tunnel Destination IP
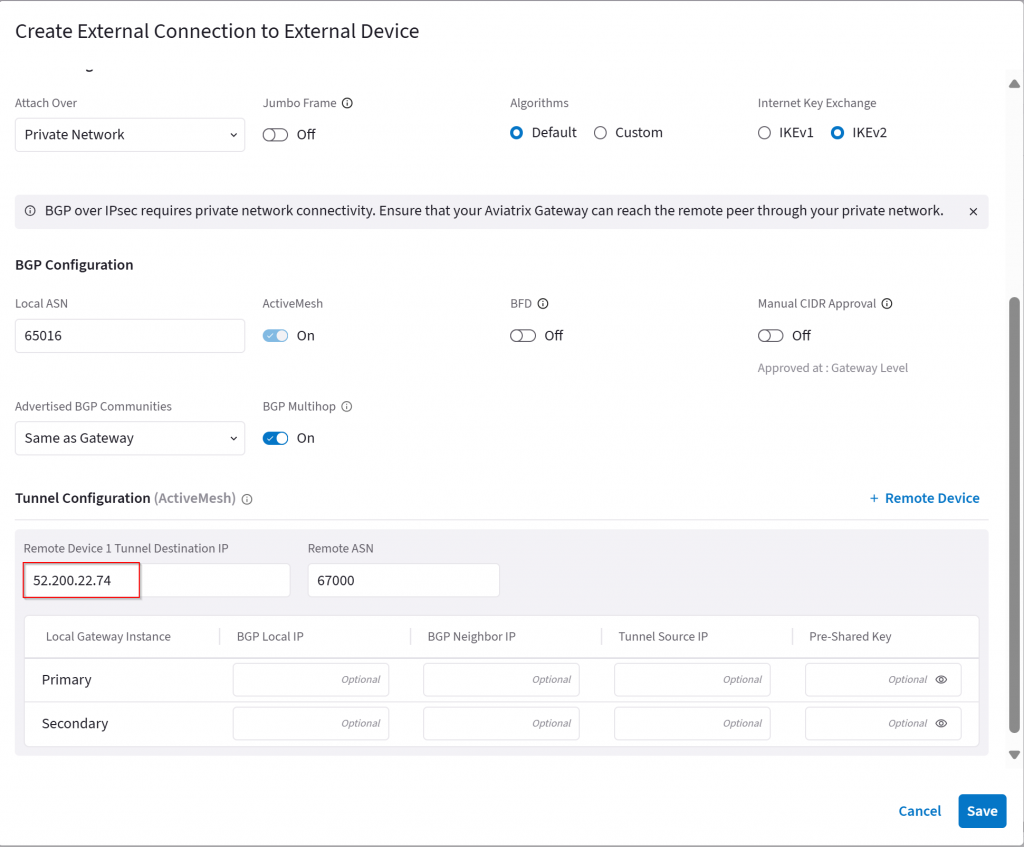
Notice how Remote Device IP point to the same public IP from both primary and HAGW.

Scenario two
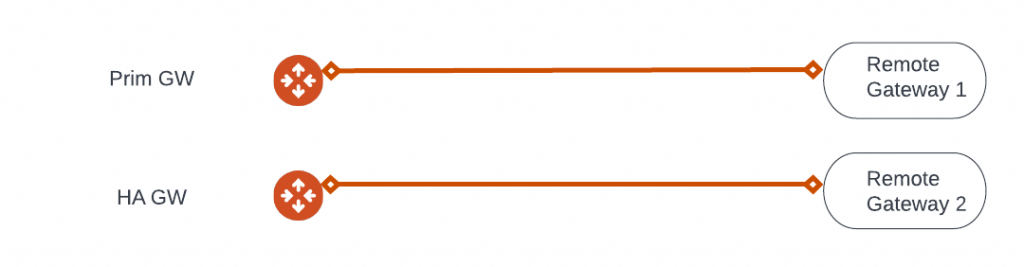
Two Remote Gateways, no Remote Gateway HA
We selected Transit1, which have two gateways: transit1 and transt1-hagw
We entered two target IPs as Remote Gateway IP separated by comma:
Still only two tunnels will be created.
- First tunnel from primary gateway to first remote gateway IP
- Second tunnel from HA gateway to second remote gateway IP

Scenario Three
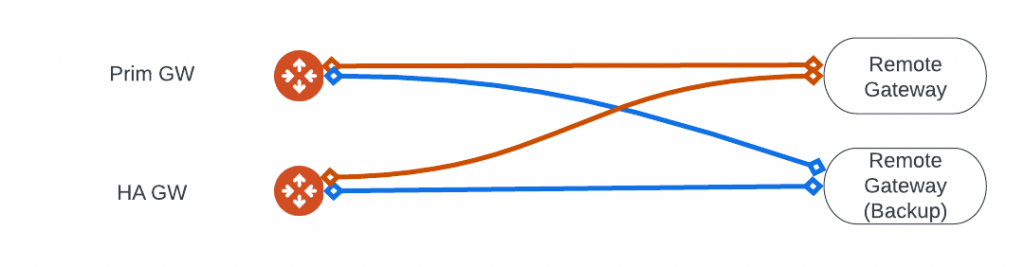
Two Remote Gateway, Remote Gateway HA
We selected Transit1, which have two gateways: transit1 and transt1-hagw
We entered two target IPs as Remote Gateway IP separated by comma:
Note: When Remote Gateway HA is enabled, you cannot enter same IP as Remote Gateway IP and Backup Remote Gateway IP, makes sense:
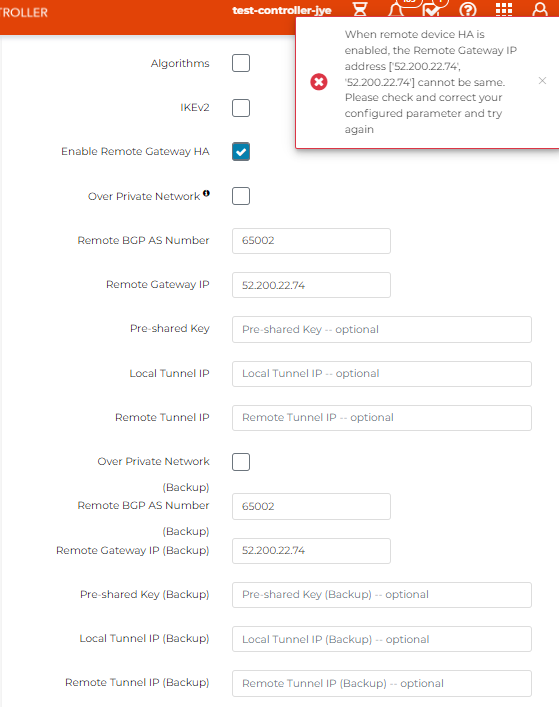
With Enable Remote Gateway HA checked, enter two different IP for Remote Gateway and Backup Remote Gateway
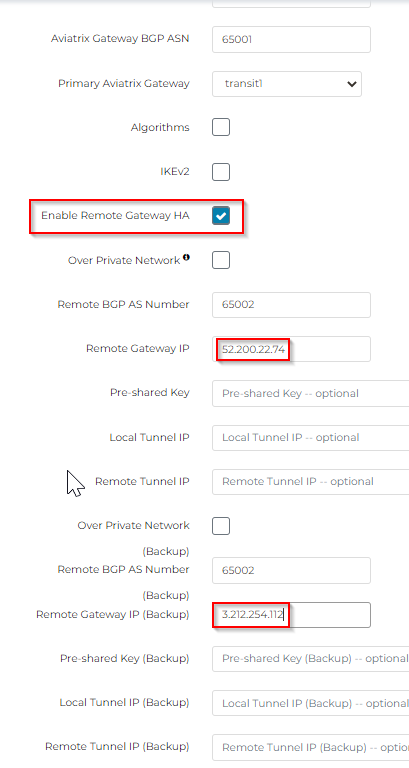
Now four tunnels will be created, each transit gateway will try to establish a tunnel with both remote gateways

2022-10-17 Addition for Tunnel IPs
In above examples, I have left tunnel IP, pre-shared keys blank, so they are generated by Aviatrix automatically, and then can be downloaded as configuration file.
Aviatrix is looking for /30 for IPSec tunnel IPs, and /29 for GRE tunnel IPs. (Requirement for TGW Connect)
Here’s an reference example to plan for those IPs:
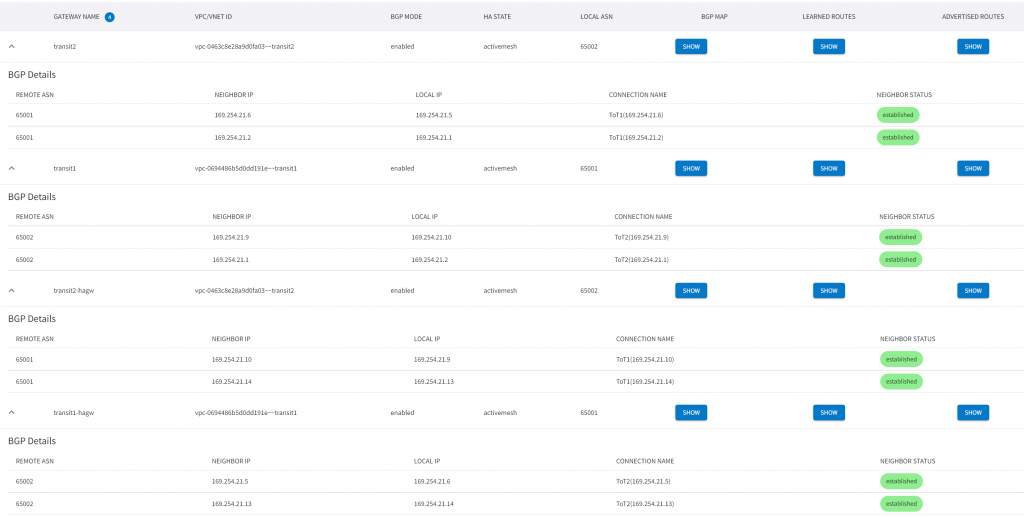
From transit1 to transit2, notice I placed “|” in between BGP neighbors, first IP represent the primary GW and second IP represent HA GW
Local Tunnel IP:           169.254.21.2/30,169.254.21.6/30

                                  |               |
Remote Tunnel IP:          169.254.21.1/30,169.254.21.5/30


Local Tunnel IP (Backup):  169.254.21.10/30,169.254.21.14/30
                                  |               |
Remote Tunnel IP (Backup): 169.254.21.9/30,169.254.21.13/30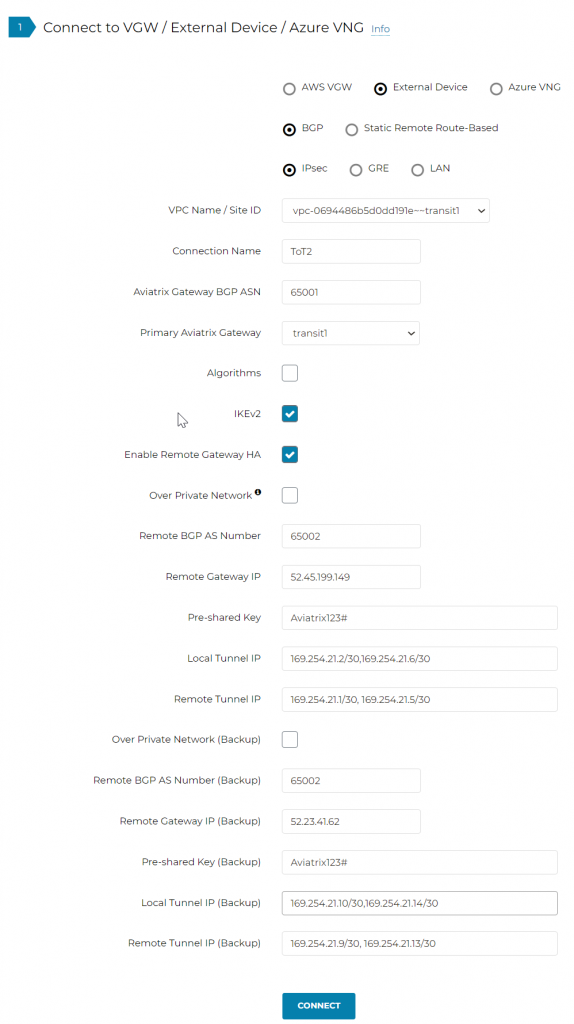
From transit2 back to transit1, notice I placed “|” in between BGP neighbors, first IP represent the primary GW and second IP represent HA GW
Local Tunnel IP:           169.254.21.1/30,169.254.21.9/30
                                  |               |                                                     Remote Tunnel IP:          169.254.21.2/30,169.254.21.10/30


Local Tunnel IP (Backup):  169.254.21.5/30,169.254.21.13/30
                                  |               |
Remote Tunnel IP (Backup): 169.254.21.6/30,169.254.21.14/30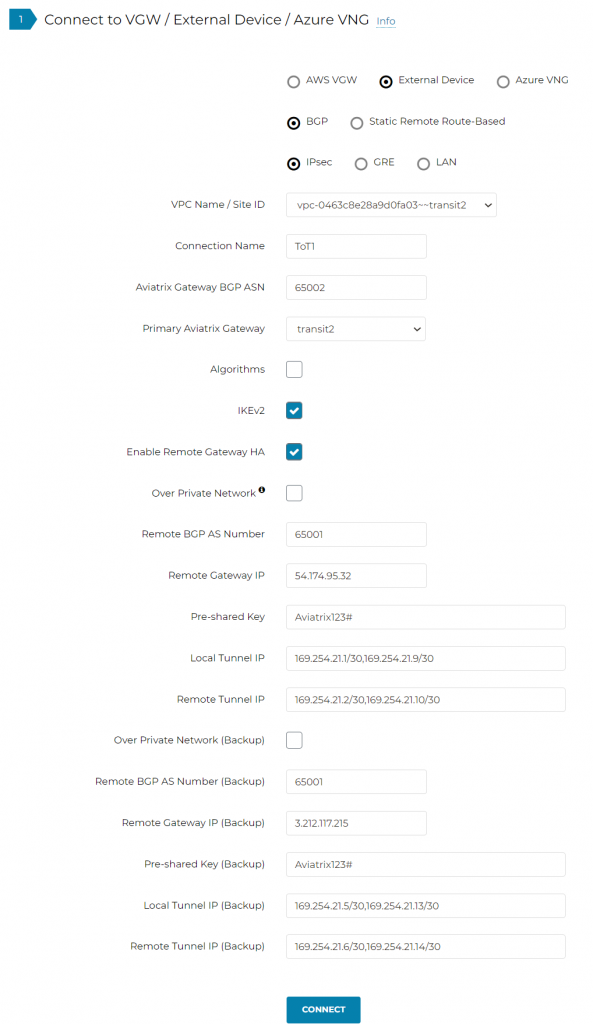
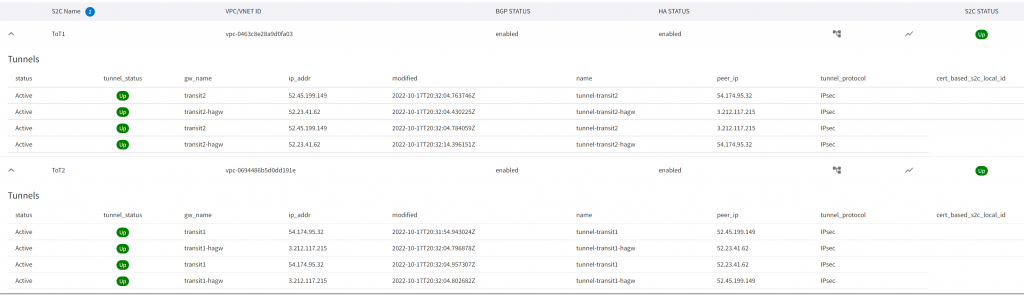
CoPilot -> Cloud Routes -> Site 2 Cloud shows the IPSec tunnels:
CoPilot -> Cloud Routes -> BGP Info shows the neighbor relationship:
Great , succinct and explained well, thanks!